This guide explains how to set up automated scripts to streamline workflows. It is intended for system administrators.
In aACE, you can configure automation schedules that run in the background. These schedules can automatically update the system in various ways, such as checking for incoming email, updating accounting balances, posting job costs, updating inventory and pending POs, sending system notices, and more.
The out-of-the-box aACE 6 automation schedules cover most high-priority functionality for most organizations. The best timing for running these scripts can vary. You can easily change the frequency of an automation schedule.
Changing the Frequency of an Automation Schedule
- Navigate from Main Menu > System Admin > System Preferences > Automation Schedules tab.
- Click the Schedule Setup tab and locate the desired Schedule Script.
- Update the frequency, using the following settings:
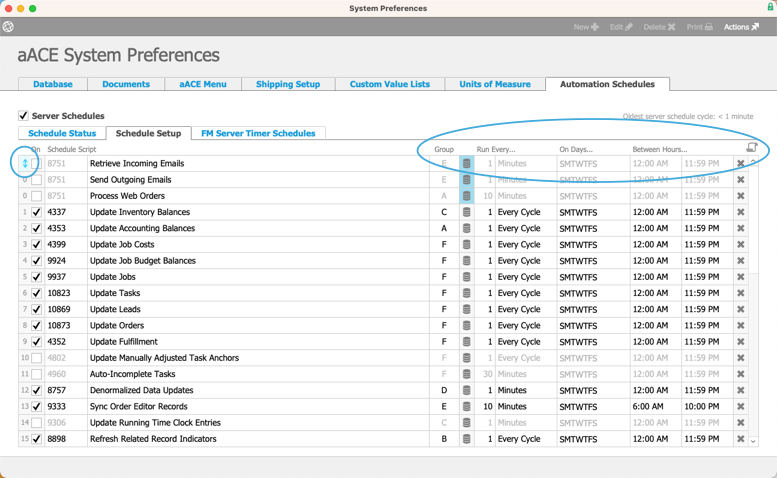
- List Adjustment Arrows (
 ) — Hover your mouse cursor over the row numbers to the left to see the List Adjustment Arrow. Click and drag to move an entry higher or lower in the list. Scripts higher in the list run before other scripts in the same group scheduled for the same time.
 - Group — Organize scripts in various ways (e.g. by related functionality, by processing times, etc).
Note: You can view the status and exact timing of your groups from the FM Server Timer Schedules tab (see below). - Script Parameter (
 ) — Enter FileMaker coding to specify which records should be updated when the script runs.
Example: The script to re-authorize credit cards could include a parameter to identify credit card records past a certain timeframe (e.g. DaysOld=40) . - Run Every... — Enter the number and time measurement for when the script should run. You can also assign a calculated timeframe for it to run (e.g. Last Day of Month).
- On Days... — Click the field and mark the flags for the days of the week when the script should run.
- Between Hours... — Enter the hours when the script should run.
- aACE Schedule Scripts (
 ) — Displays the list of recognized schedule scripts that exist behind-the-scenes. This list informs the drop-down value list in the Schedule Script entry fields. Lines that are grayed out represent schedule scripts that exist, but have not been added to the Schedule Setup portal yet.
- List Adjustment Arrows (

 ) — Hover your mouse cursor over the row numbers to the left to see the List Adjustment Arrow. Click and drag to move an entry higher or lower in the list. Scripts higher in the list run before other scripts in the same group scheduled for the same time.
 ) — Enter FileMaker coding to specify which records should be updated when the script runs.
 ) — Displays the list of recognized schedule scripts that exist behind-the-scenes. This list informs the drop-down value list in the Schedule Script entry fields. Lines that are grayed out represent schedule scripts that exist, but have not been added to the Schedule Setup portal yet.
When you click out of the Schedule Setup portal, aACE automatically commits the adjustments you make.
FM Server Timer Schedules
This tab provides additional information on the status and exact timing of your Script Schedule Groups. You can view the last automation schedule that was run in each group, as well as the current status of the various cycles. In addition, you can put a temporary pause on all automation schedules by clicking the link to Halt Timers on Server.

For specific questions about the timing of your automation schedules, contact aACE advisor. They can guide you through additional configurations.
Manually Running a Schedule Script
On the Schedule Status tab, each automation schedule includes a RUN link to the right. Clicking this link displays a prompt to either run the script locally or on the server. In nearly all cases, running the script on the server is the appropriate selection.
Activating New Schedule Scripts
You can activate additional FileMaker scripts at the Automation Schedules screen. For new, custom scripts, contact your aACE advisor.
- Navigate from Main Menu > System Admin > System Preferences > Automation Schedules.
- Click the Schedule Setup tab, then scroll down to the first blank row.
- Click the Schedule Script field, then select the desired script.
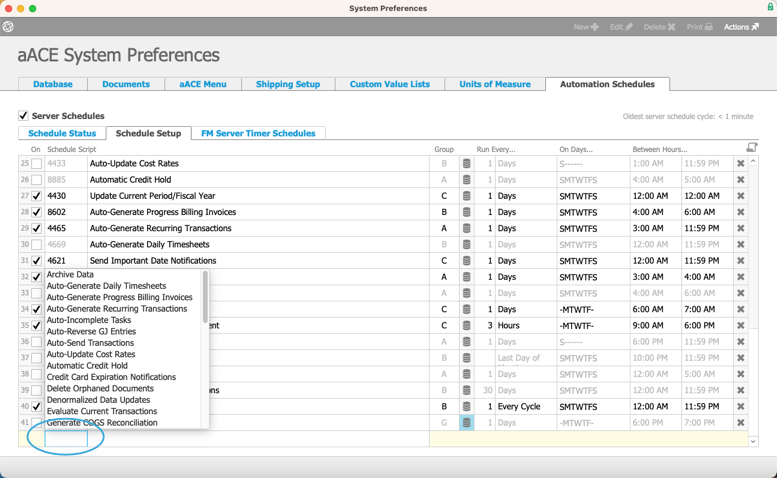
- Specify the frequency for the script (as explained above).
- Mark the flag in the On column.

When you click out of the Schedule Setup portal, aACE automatically commits any adjustments made to the Schedule Setup.
