This guide explains the general steps to import data from a source file to an aACE module. It is intended for general users.
After you understand how FileMaker approaches data imports and you have prepared your data, you can import your data records.
When you start an import, ensure your schedule is organized so you have enough time to complete it. You may need to plan in additional time when importing a large spreadsheet.
Importing data records for the Rich App is a different process than WebDirect.
Importing the Records in the Rich App
The aACE rich app is accessed through a client on your device. The import process is standard across all modules. The following example uses the Companies module.
- From the module's list view, select Actions > Import [records].

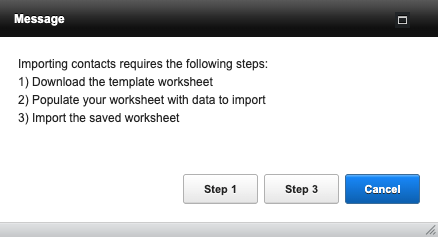
- At the confirmation dialog, select the appropriate step:
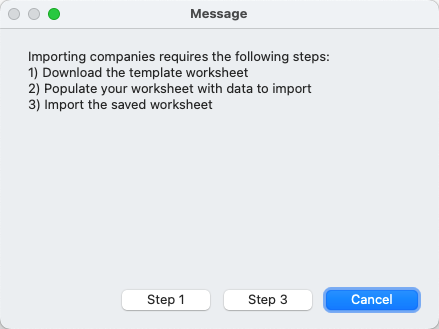
- Step 1 — Select Step 1 if you do not already have a prepared spreadsheet. This will generate a spreadsheet that includes the currently displayed records with the relevant column headings. Save this export in Excel or FileMaker format. Populate the spreadsheet with the needed data, then begin the import process again and select Step 3.
- Step 3 — Select Step 3 if you already have an Excel or FileMaker spreadsheet with the necessary data.
- At your workstation Open File dialog, locate and open your spreadsheet source file.
- At the Specify Import Order dialog, verify the settings for Row Counter, Source-to-Target, and Target Fields:
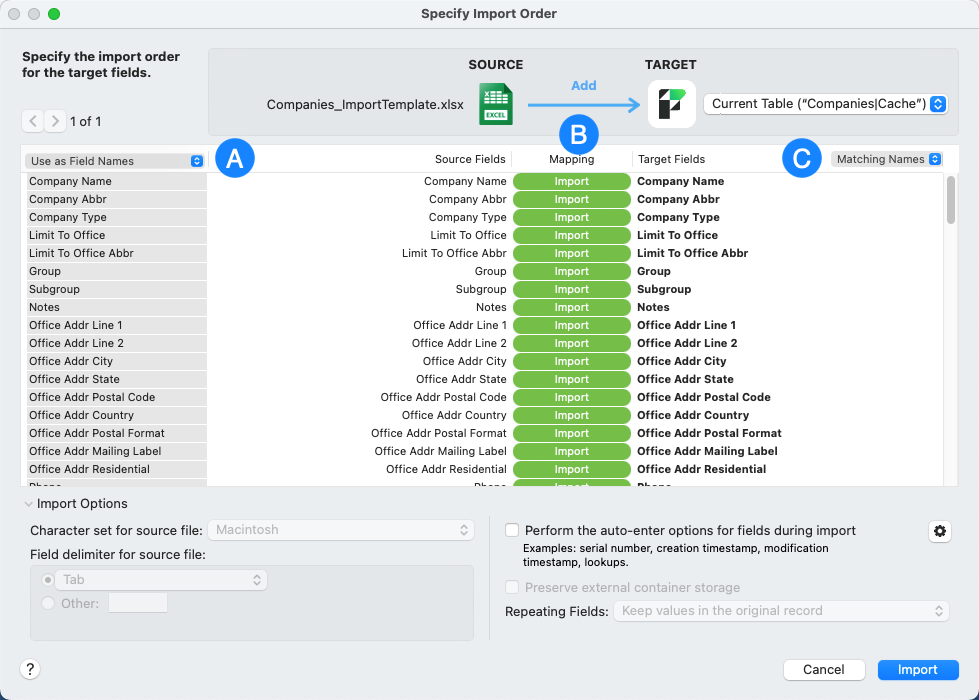
- Row Counter — Set to row 1 and Use as Field Names.
This sets the spreadsheet header row as the source fields, making it easy to match the names of the target fields. - Source-to-Target — Set to Add.
"Adding" new records is required. The incoming data is brought in as new records to a cache table. After that stage is complete, the data is transferred to your existing business records. - Target Fields — Set to Matching Names.
This automatically matches the source field names to the database target field names. If you are manually mapping the import fields, set these options, then continue with the process referenced in Mapping Import Fields By Hand.
- Row Counter — Set to row 1 and Use as Field Names.
- Verify that Source Fields are matched correctly to Target Fields, then select Import.
- At the Import Summary dialog, review the number of records updated to the cache table, then select OK.
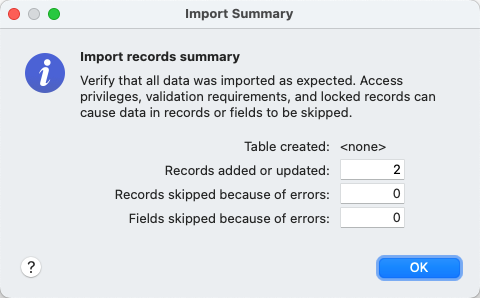 aACE completes a validation check on the data in the cache table:
- If no violations are found, aACE imports the records.
- If violations are found, aACE displays another message summarizing the import validation errors.
- At the confirmation message, review the number of imported records and select OK.
- At the activation message, select Activate.
You can also leave imported records in Pending status by selecting Cancel. For any records that are not activated automatically, you can manually activate them later.


 aACE completes a validation check on the data in the cache table:
Manual Activation for Imported Records
To activate a single record:
- At the module's list view, use the Quick Search bar to locate the record.
- On the record's line, select Actions (
 ) > Activate [record].
 - At the activation dialog, select Activate.
 ) > Activate [record].
 You can also manually activate multiple records in a batch:
- At the module's list view, use the Quick Search bar to locate all the records requiring activation.
- On the menu bar, select Actions > Activate [records] in List.
- At the activation dialog, select Activate.
Importing the Records in aACE WebDirect
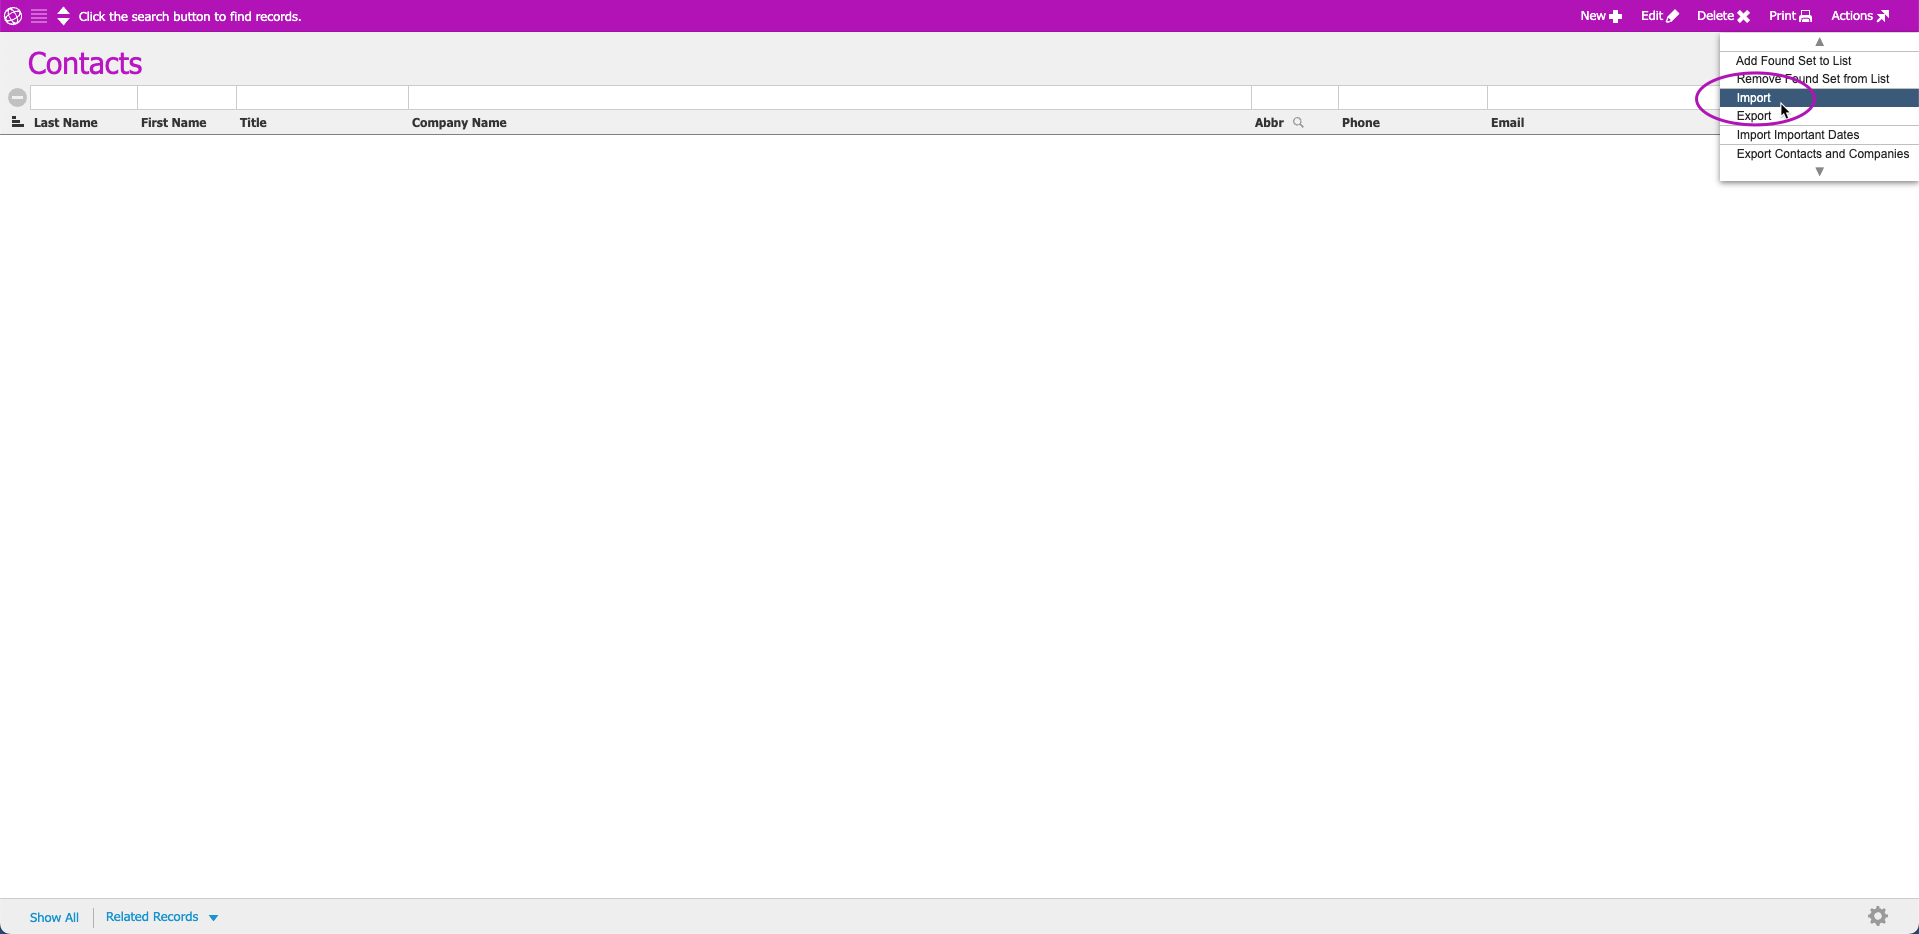
Importing records using the browser version of aACE, also known as WebDirect, is a different process than importing records using the Rich App. Like the Rich App, the browser version import process is standard across all modules. The following example uses the Contacts module.
- From the module's list view, select Actions > Import.
- At the confirmation dialog, select the appropriate step:
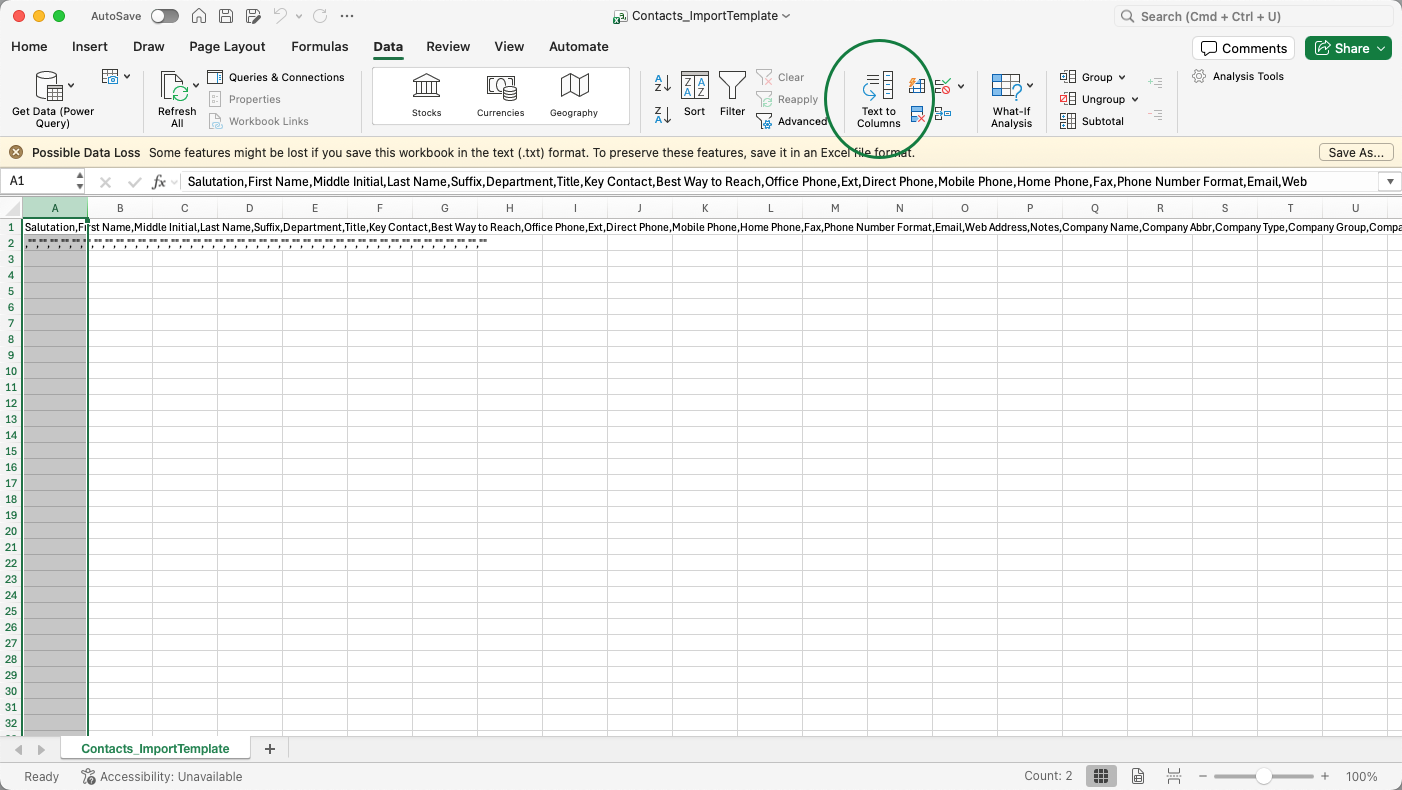
- Step 1 — Select Step 1 if you do not already have a prepared spreadsheet. This will generate a .csv file that includes the currently displayed records with relevant column headings. When you open the file, the relevant column headings will be contained in the first cell of the spreadsheet. To separate them and continue with the import process, follow these steps in Excel:
- Select column A in the spreadsheet.
This should highlight the entire first column. - Navigate to the Data tab and select Text to Columns.
- In the Convert Text to Columns Wizard, select Delimited and select Next.

- Deselect Tab and select the Comma. Then select Next.
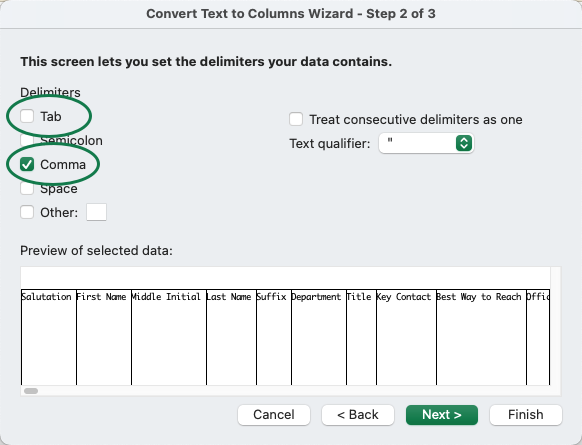
- Select Finish.
- Save this export in Excel or FileMaker format. Populate the spreadsheet with the needed data, then begin the import process again and select Step 3.
- Select column A in the spreadsheet.
- Step 3 — Select Step 3 if you already have an Excel or FileMaker spreadsheet with the necessary data.
- Step 1 — Select Step 1 if you do not already have a prepared spreadsheet. This will generate a .csv file that includes the currently displayed records with relevant column headings. When you open the file, the relevant column headings will be contained in the first cell of the spreadsheet. To separate them and continue with the import process, follow these steps in Excel:
- After selecting Step 3, select Choose File.
- At your workstation's Open File dialog, locate and open your spreadsheet source file.
- Select Import.
- At the Import Field Mapping dialog, verify that Don't import first record (contains field names) is selected.
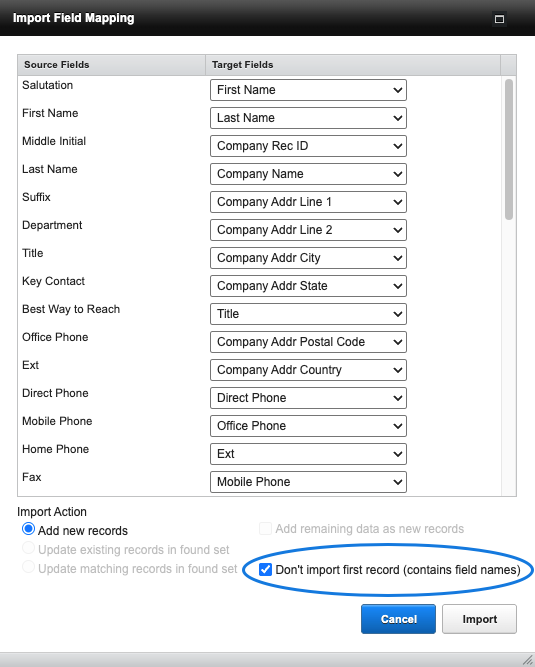
- Scan the list of field names to verify that Source Fields are matched correctly to Target Fields, then select Import.
- At the Import Summary dialog, review the number of records updated to the cache table, then select OK.
aACE completes a validation check on the data in the cache table:- If no violations are found, aACE imports the records.
- If violations are found, aACE displays another message summarizing the import validation errors.
- At the confirmation message, review the number of imported records and select OK.
- At the activation message, select Activate.
You can also leave imported records in Pending status by selecting Cancel. For any records that are not activated automatically, you can manually activate them later.


Manual Activation for Imported Records
To activate a single record:
- At the module's list view, use the Quick Search bar to locate the record.
- On the record's line, select Actions () > Activate [record].
- At the activation dialog, select Activate.
You can also manually activate multiple records in a batch:
- At the module's list view, use the Quick Search bar to locate all the records requiring activation.
- On the menu bar, select Actions > Activate [records] in List.
- At the activation dialog, select Activate.
Validation Errors on Your Import
aACE validates every import against key data fields to confirm data integrity in your system. If errors are found, aACE can generate a copy of your import spreadsheet with notes about the trouble areas so you can resolve the import validation issues.
