This guide explains how to create an aACE test system. It is intended for system administrators.
You can create an aACE test system for testing, development, or other purposes. The process includes these steps:
- Creating a backup system from a live system
- Enabling automation schedules for the test system
- Disabling unneeded services
Creating a Live System Backup
To access your most recent live system backup, navigate to your Backups folder. Use the most recent backup, typically found at the bottom of the file list. Inside that backup folder, click the Database folder, then the aACE folder.
To prepare your data for the test system, you must first change the file name of the live system backup. We recommend using a distinctive file name or clear naming convention. This is essential so it will not conflict with the file on the live server. Additionally, users need to be able to tell which system they are accessing.
Warning: The follow steps should be done AFTER HOURS. Ensure that no one is using the server.
Change the file names using FileMaker’s Developer Utilities. This is essential in order to update the names in FileMaker’s internal file references.
- Navigate from FileMaker Pro Advanced > Tools > Developer Utilities.
- Click Add....
- Select each of the files in the aACE folder from the live system backup.
- Change the file names inside the Developer Utilities by adding a prefix (e.g. “TEST_”), then clicking Change.
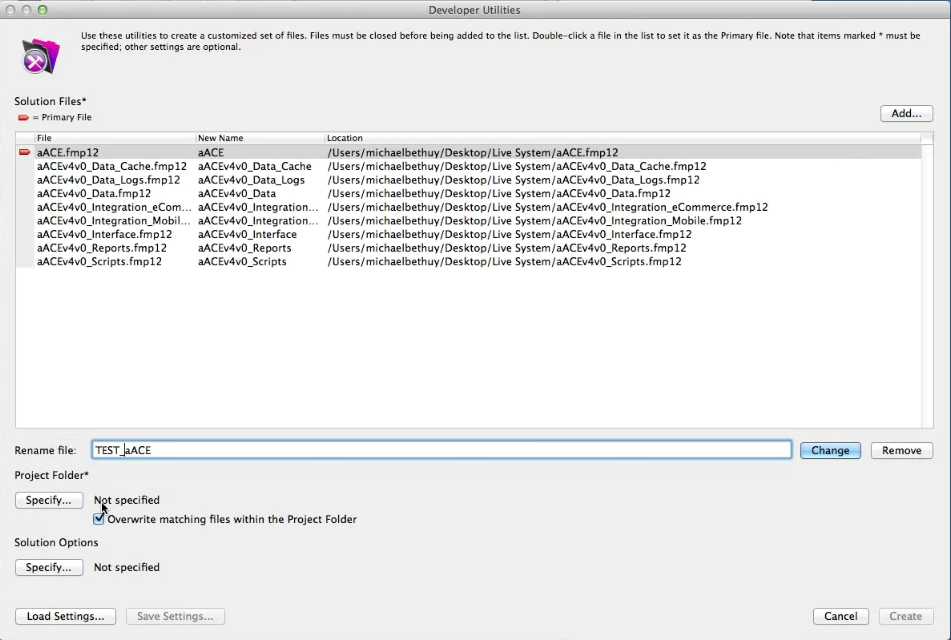
- When you have changed all the file names, dedicate a primary file by placing the red arrow icon (
 ) adjacent to the aACE file (i.e. the Menu file).
 - Click Specify and choose a location on the server for your test system.
Note: This can be the same folder as the live system or a newly created test folder. - Once you have selected the location folder, click Create.
Note: This process may take a few minutes to complete.

The next steps depend on whether you are creating a new test system or replacing an existing test system.
Creating a New Test System
If you do not have a test system already, copy the test system files into the Databases folder (FileMaker Server > Data> Databases).
Warning: The live files are also in the Databases folder. Do NOT copy the test files into the live files. They must be kept separate.
Replacing an Existing Test System
Only complete these steps after business hours when users will not be accessing the system:
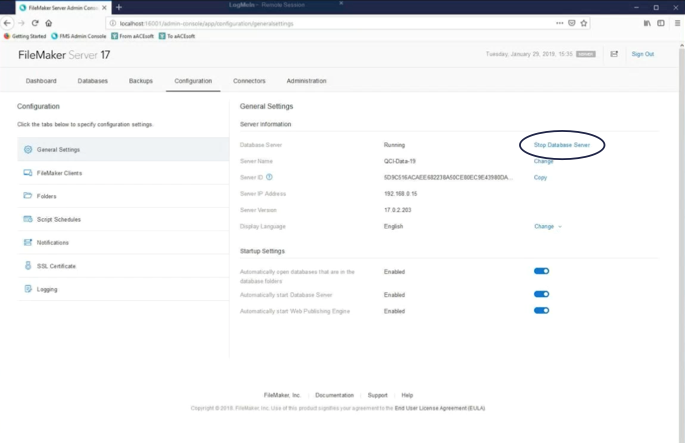
- Navigate to the FileMaker Admin Console > Configuration > General Settings.
- Click Stop Database Server.
- Navigate back to your Databases folder that contains the system you are replacing.
- Delete the system files you are replacing.
- Copy the new test system files into the Databases Folder.

When replacing the system has been complete, restart the server (i.e. FileMaker Admin Console > Configuration > General Settings > Start Database Server).
Note: When the server is turned back on, it will open all the files at once. To confirm the files have been opened, navigate to the FileMaker Admin Console > Databases, then observe the test files. If the status indicator dots next to the files are blue, the test files are live. If the indicators are red, it means they are still opening.
Enabling Automation Schedules for the Test System
Before you log into your test system, you must create new automation schedules. Note: This only applies the first time you are working with a new test system.
- Navigate to FileMaker Admin Console > Configuration > Script Schedules.
- Select an automation schedule, and click Duplicate at the top of the automation schedule list.
The copied automation schedule can should be the original schedule's name with "Copy" at the end. - Click Settings for the copied automation schedule.
- Click Edit at the bottom of the copied automation schedule information.
- Remove "aACE 6" from the copied automation schedule title and replace it with "TEST".
- Remove "Copy" from the copied automation schedule title.
- Appoint the Database to the new test system's Scripts file.
- Set the Script to Automation Schedule.
Your automation schedule should look similar to this:
- Click Save.
- Repeat steps 2-9 above for all necessary automation schedules.

When all the new automation schedules have been created, make sure they are Enabled.
Note: For every new system you create, you must follow this process to create new automation schedules.
Disabling Unneeded Services
Next, you must log in and disable any services that will not apply to your test system. You can log in using the same credentials you use for your live system.
You can disable services in one of two ways: through Programmer Mode or manually disabling services.
Disabling Services Through Programmer Mode
You can log into Programmer Mode to disable services. aACE will prompt you to disable the necessary services (e.g. email integration, etc):
The specific prompts you receive will depend on which services are enabled in your live system.
Disabling Services Manually
- Navigate from the Main Menu > Accounting > Preferences > Integrations.
- Disable any credit card integrations.
This will prevent aACE from charging credit cards in your test system. - Navigate from Main Menu > System Admin > Preferences > Automation Schedules > FM Server Timer Schedules tab.
- Remove any automation schedules that pertain to the live system.
Note: You may get automation schedule errors by doing this. Click Delete on them, as deleting the schedules does not effect other systems. - Navigate from Main Menu > System Admin > Preferences > Database Management > Integrations section.
- Ensure all the preferences there are disabled.
You can also disable services using the System Preferences option in the sidebar.
If you intend to turn on Automation Schedules within the testing environment, you must also disable these integrations:
- NRG
- Email processing
- Credit card-related processes
- eCommerce
- Mobile
Once the services have been disabled, close the file set. The test system is now ready to use.
