This guide explains functionality that aACE provides for managing multiple business entities. It is intended for system administrators.
aACE can help you organize people, products, and financials across different business entities, locations, or even brands. For an example of how this feature can help your team, read our feature highlight.
Organizing Multiple Companies Using Offices
The Offices module enables you to organize one or more companies operating from one or more locations. You can set up each office record as a distinct business entity, including a separate tax ID, address, logo, etc.
Team Members
Each aACE user will have a Team Member record linked to their respective office. You can use settings on this record to control the level of access a team member has to various offices, departments, and records.
Navigate from Main Menu > Internal > Team Members > desired team member record > Human Resources tab. In the Record Access section, you can edit the record and configure these settings:
- Can view records assigned to any office
- Can view records only assigned to the offices listed below — Constrains team members to only view records in the office(s) you specify
Note: This flag cannot be marked when the preceding flag is marked. - Can switch offices — Enables team members to switch offices for their current session
Note: Each user's current office assignment is displayed in the footer of the Main Menu. - Can view records assigned to any department — Enables team members to view all records in the current office, regardless of their assigned department
- Can edit Comments and Activities — Enables team members to edit the Comments and Activities section of records they can access
User Groups
The User Groups module includes settings that control various levels of access a specific group of team members have to viewing, editing, and managing specific types of records:
- Navigate from Main Menu > System Admin > User Groups > select the desired User Group > Module Access tab > click Edit.
- In the Access Privileges section, click Search (
 ) > select the desired Module(s) > Save.
This gives all team members in the user group basic access to the module(s). - In the Access Privileges section, mark / clear the flags to further configure the level of access the user group should have for records in the specified module(s).
Note: You can mark / clear a batch of flags:- Section-Level icons (
 /
/ ) icons — Marks or clears a specific flag for all modules currently in the list
 - Module-Level icons (
 /
/ ) icons — Marks or clears all flags for that specific module
- Section-Level icons (
- Click Save.
 ) > select the desired Module(s) > Save.
 /
/ ) icons — Marks or clears a specific flag for all modules currently in the list
 /
/ ) icons — Marks or clears all flags for that specific module
Line Item Codes (LICs)
Each of your products in aACE are associated with an office. You can manage the office-specific settings for LICs so they display for certain offices.
Inventory on Orders
When team members are working on orders, aACE constrains the LIC lists to show only the products associated with that office. This streamlines workflows since users in one office don't have to filter through records associated with separate offices.
An order record is initially associated with the current office and department of the team member who generated it. Note: For team members who can switch offices, orders they generate are initially associated with the office they are currently logged into.
You can change the assigned department of an order while it is in Pending status. Because offices are derived from departments, changing an order's department may also change the office association.
Inter-Office Inventory
Sometimes product purchased for one location must be transferred to a location where the demand is greater.
With aACE's data entry preferences for Accounting, you can prevent one office from being expensed for another office's use of inventory. Navigate from Main Menu > Accounting > Accounting Preferences > Accounting Settings tab > Inventory section. Mark the flag to 'Prevent inter-office COGS transactions'.
If needed, you can clear this flag and configure your system for inter-office accounting (see below).
Accounting
You can configure aACE to show account balances associated with all offices at once or to only show balances for a user's current office assignment.
GL Accounts
To adjust GL accounts preferences, navigate from Main Menu > Accounting > Accounting Preferences > Chart of Accounts tab > Offices tab > Multi-Office Preferences section. Mark the flag to 'Manage office general ledgers separately'.
When this flag is marked, your system filters the GL Accounts module to show only the transactions for the current office. aACE displays a header above the accounts list to remind users which office is being displayed:

Note: Users with certain User Group privileges may be able to switch between offices at the Main Menu. After switching, they can view the GL Accounts for the new office.
Inter-Office A/P and A/R Accounts
When your separate offices conduct internal transactions, you can set up accounting preferences to help track these exchanges:
- Navigate from Main Menu > Accounting > GL Accounts.
- For each office you have created for your organization, create an A/P account and an A/R account.
- Navigate from Main Menu > Accounting > Accounting Preferences > Chart of Accounts tab > Offices tab.
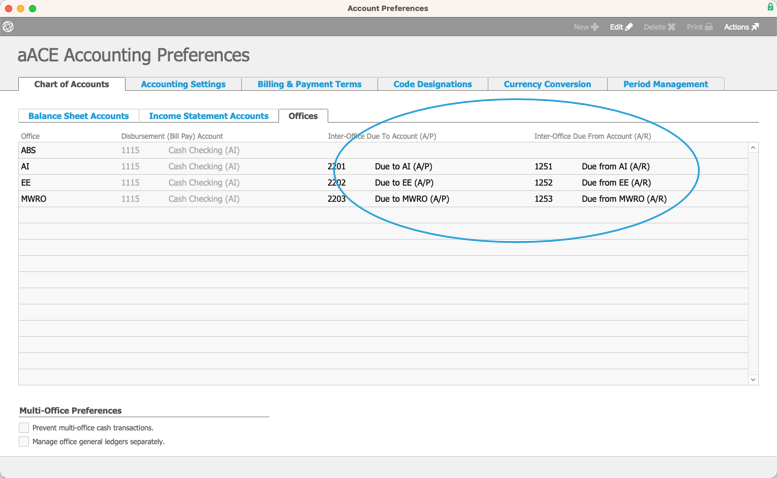
- Click Edit, then specify the inter-office A/P and A/R accounts for each office.
Note: As the screenshot above shows, the line for an office should include the due-to and due-from accounts for that office. aACE will apply those accounts appropriately as they are used by other offices. - Click Save.

Examples of Inter-Office Transactions
After you organize your inter-office accounts, aACE will track receivable and payable balances between your offices. It will automatically create an A/R balance for the office that purchased the inventory and an A/P balance for the office that used the inventory.
For example, if two offices are paying part of a purchase (e.g. rent for a shared space), you can specify each Dept field on the Purchase record. In the General Ledger, the office that originates the purchase gets the Accounts Payable balance for the overall purchase. aACE also automatically creates a receivable balance for the part of the purchase due from the second office, plus a liability on the second office's accounts for what they owe to the originating office.
As an example with receivable transactions, one office could sell a line item code which another office should receive the proceeds for (e.g. the inventory belongs to one entity, even though other entities can add it on orders). aACE would create an A/R balance for the office that should receive the sale and an A/P balance for the office that handled the sale.
Bank Accounts
Specify a Bank Account for the Office
For each office, you can specify a default bank account for disbursements. Navigate from Main Menu > Accounting > Accounting Preferences > Chart of Accounts tab > Offices tab. Click Edit, then click the field for 'Disbursement (Bill Pay) Account' and select an option. (Note: After you manually assign a specific account in this field, it will not be affected by changes to the Default Disbursement account noted on the Balance Sheet Accounts tab.)
For organizations with separate legal entities, you can help avoid reconciliation problems by constraining bank accounts to a single office (e.g. Bank of America 1107):
- Navigate to the GL Accounts module and locate the desired account.
- At the detail view, click Edit.
- In the module footer, click the Limit-To Office field, then select the appropriate office.

- Click Save.

Prevent Cash Transactions
Another oversight feature is the 'Prevent multi-office cash transactions' option. When you mark this flag, aACE verifies details to ensure cash separation between legal entities. It constrains receipts and disbursements to be assigned only to bank accounts linked to the office creating the receipt or disbursement.
Navigate from Main Menu > Accounting > Accounting Preferences > Chart of Accounts tab > Offices tab. In the Multi-Office Preferences section, mark the flag to 'Prevent multi-office cash transaction.

Financial Printouts
You can generate various financial reports, either for a single office or for all offices. At the GL Accounts module, click the Print ( ) icon, then select the desired report. For example:
- To print a balance sheet for a single office, select Balance Sheet, specify the desired office, and click Print.
- To print a balance sheet for all offices, select Balance Sheet, leave the Office(s) field blank, and click Print.

