This guide walks you through initial steps for getting acquainted with your new aACE system. It is intended for new users in the Discovery process.
Introduction
This Discovery Training guide serves as a supplement to our webinar on aACE Basics. It will walk you through logging in to your new aACE system, using the Main Menu to navigate, working with list views to locate records, and working with detail views to create and edit records. For additional insight about your aACE system, we highly recommend you to watch the webinar as well.
Logging In
This guide assumes that you have worked with your aACEsoft representative to gain access to your aACE Discovery system. (If you don't yet have access, stop here and coordinate with your system administrator.)
The first step is to log in to your aACE system. You will be working in aACE as you progress through this help guide. That practice helps ensure you get the most benefit. Just reading over the guide will give a sense of what aACE can do, but practicing along will boost what you can do in aACE.
Main Menu
Upon logging in, the Main Menu will be presented. This menu helps you navigate through the rest of your aACE system.
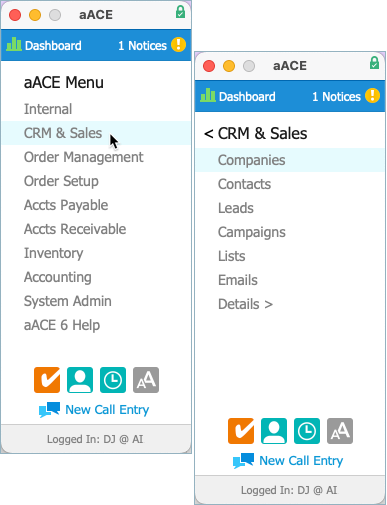 Understanding the Main Menu
 Understanding the Main Menu
The Main Menu presents multiple levels of modules and links. You can read more about the Main Menu here. This training guide will focus on a few essentials:
Modules
Each module in aACE is a set of views designed to help you work with certain groups of records (e.g. your customer and vendor companies). Modules are typically named for the kind of records they contain. During the Discovery process, your Discovery Team has access to all aACE modules. When your company goes live with aACE, team members will have more limited access, focused on their specific roles.
On the Main Menu, click on the CRM & Sales link. This displays a second level of module options. These options are all related to customer relationship management and sales tasks.

All aACE modules follow the same general conventions for layout and functionality. To see this, click the Companies module link, then the Leads module link.

This displays the list view for both modules. Feel free to arrange the two modules so you can compare them. These two modules focus on different records; however, the layout for both modules is very similar. This consistency means that after you learn to work with one aACE module, you're prepared to work with nearly every other module.
Close the Leads module by clicking the 'X' button in the upper corner (i.e. left corner for Mac, right corner for PC).
Zoom
One useful detail on the Main Menu is the Zoom button ( ). This accessibility preference allows you to change the size of text in aACE modules.
Experiment with Zoom Settings
Now that you know you can open multiple module windows at the same time, which can be extraordinarily useful for comparing records and information, let's practice this useful feature by exploring the Zoom preference.
- From the Main Menu, click the CRM & Sales option, then the Companies option (if you haven't already).
This displays the Companies module at the standard, 100% zoom setting. - On the Main Menu, click the Zoom button (
 ).
).
This displays a prompt that summarizes what the zoom setting will do and what variations you can select. - Click the button to select 150%.
This doesn't immediately change anything on the screen, but it sets the preference in aACE.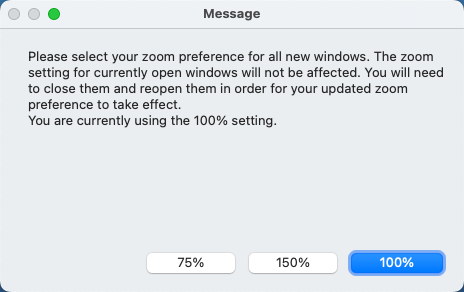
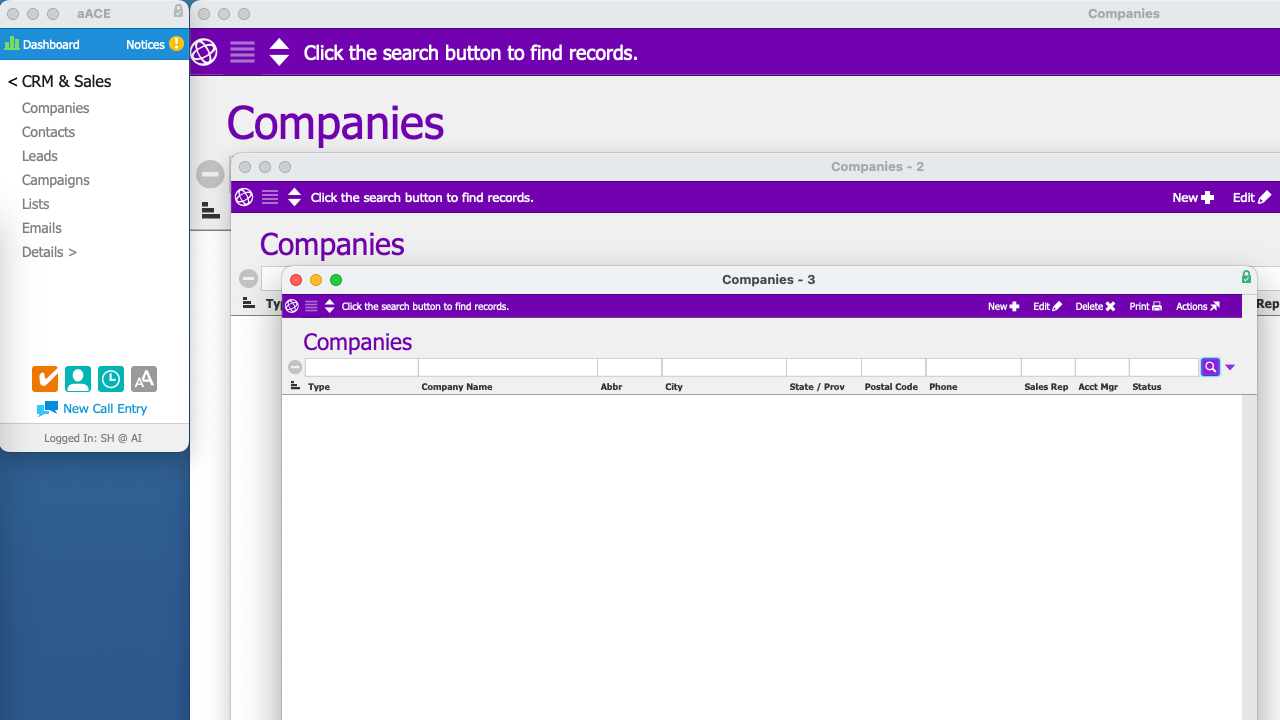
- Click Companies a second time.
A second window showing the Companies module displays, but at a larger resolution. - Repeat this process: click the Zoom button again, this time select 75%, then click the Companies option a third time.
A third window displays the Companies module at a smaller resolution. - Click-and-drag the module title bars to arrange them so you can compare all three versions.
- Close all three modules, then click the Zoom setting again and select the option you prefer.
- Click the CRM & Sales link in the Main Menu to return to the starting level.
This displays the previous level of menu options so you can navigate to other modules.


Data Types
aACE categorizes data into two broad groups:
- Master Data — Records needed to conduct an exchange with another organization (e.g. companies and line item codes)
- Transaction Data — Records documenting an exchange with another organization (e.g. purchasing from vendors, selling to customers)
aACE uses these two data types to help you manage your business. For further insight, you can read more about master and transaction data.
List View
When you open a module, it initially displays the list view. The list view presents a group of records associated with that module. List views are designed to help you locate the records you need to work with. You can build unique lists to review, update, print, share with others, etc. We'll use the Companies module as an example.
On the aACE Main Menu, click CRM & Sales, then click Companies.
Each list view has a default view. Common default views include 'records assigned to you' or 'all open records'. For example, the Companies module list view initially shows company records that are assigned to the current team member. Since no company records are assigned to you yet, when you open the Companies module, no records are displayed.
Warning about Blank List Views
It's important to keep the default view in mind. It can be alarming if you create a record in a module, but go back to that module and aren't able to see your record in the list view.
If this happens, it's usually because the default view is showing a filtered set of records. You can easily locate your record by using the search tools. See below.
Searching in the List View
Every list view includes powerful features for searching through records.
Across the top of the screen, the Quick Search bar helps you search by key fields. In the Companies module list view, you can search for a company by name, address, and/or the other fields visible in the list view. (You can read more about Using the Quick Search Bar.)
Across the bottom of the screen, Quick Search links let you run automated searches with a single click. For example, you can display all companies at once, display only the ones that are linked to you, or display those that have a certain amount of transactions. The default view for a module often applies one of these Quick Search links.
Populate the Companies module list view by clicking the Quick Search link to Show All.

Sample Data in the List View
Your aACE system has been populated with sample data to help facilitate training. You will be creating and importing your own data in subsequent phases of the Discovery process.

Practicing with the List View
To see how the list view functions, we'll explore some features in the Companies module. Your role in your organization might not deal directly with company records. But as a member of the Discovery team, it's important for you to understand an overview of how records connect and flow through aACE. This will help your team later when you explain the ways you need aACE to support your workflows.
- Open the Companies module if it is not already open and click the Show All Quick Search link.
This displays all existing company records from the sample data.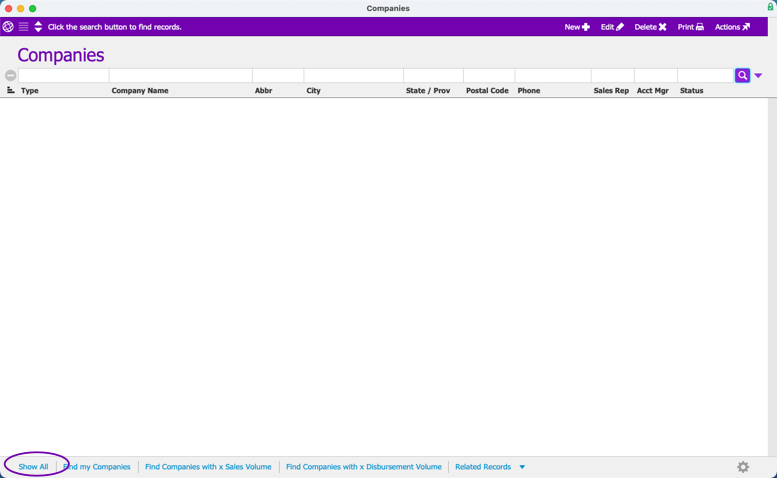
- Click the Company Name column header.
This sorts the list by company names. You can read more about sorting records in the list view.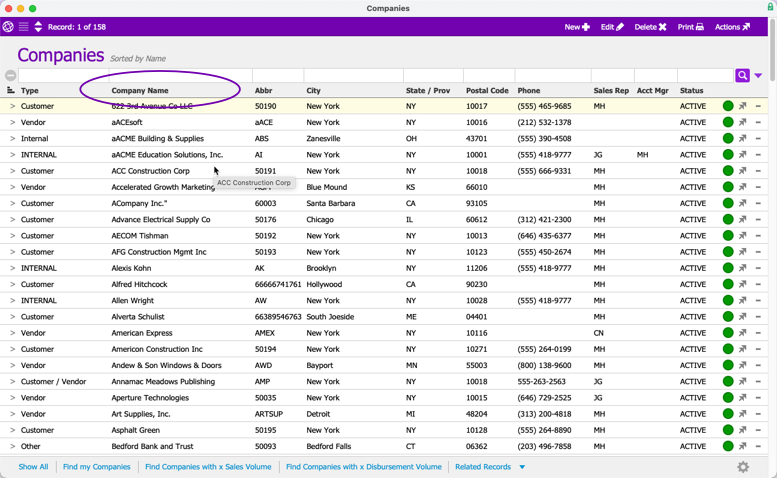
- Click the Company Name column header a second time.
This reverses the sort order.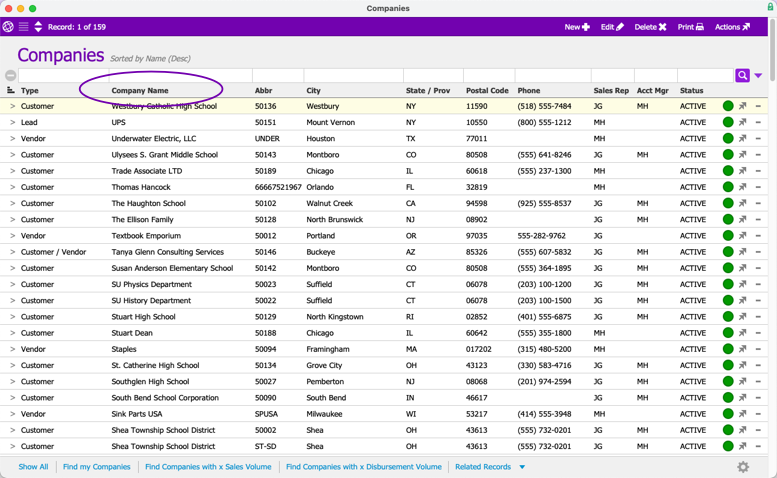
- Click the City column header.
Instead of a single, ongoing list of companies, aACE now groups the records according to the city specified in their contact information. These cities are listed in alphabetical order. The companies within that city group are presented as a subsidiary list. We call this sub-summarizing.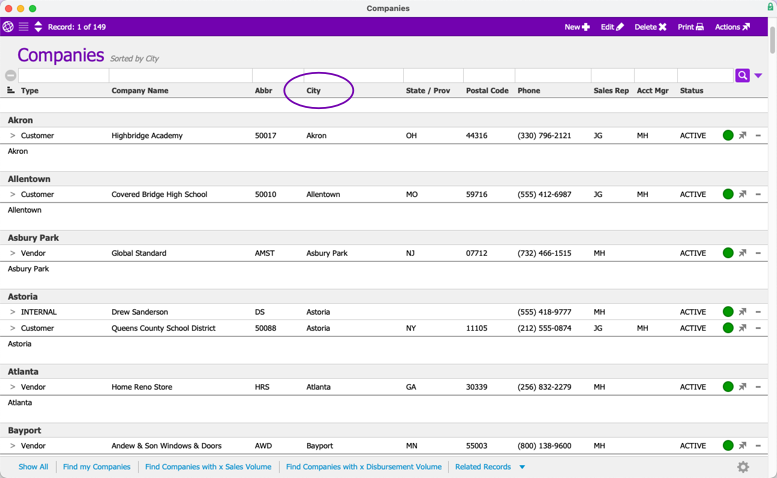
- Click the blank field above the Status column.
This displays the three options in the Quick Search bar that you can use to search for company record statuses.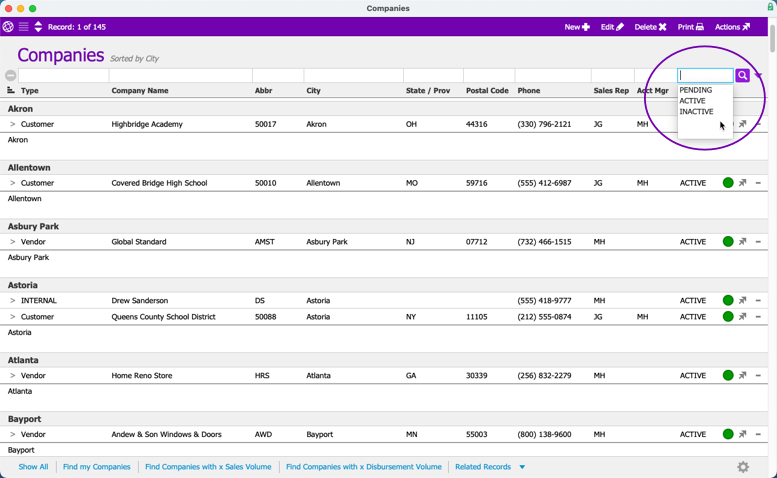
- From the Status column Quick Search options, click Inactive.
This inserts that search criteria into that field. Note: Search fields with active criteria are highlighted in yellow. Some search fields may be grayed out. This indicates that they are non-editable and cannot be changed.
 - Click the Search button (
 ).
).
This constrains the current list to Inactive companies, still sub-summarized according to city. Note: These inactive companies have a white circle on the right end of each list entry. This Status Indicator indicates the record’s status. Different records can have different Status Indicators. You can read more about Status Indicators.
 - Click the Quick Search field above the Status column again and select Active.
This replaces the previous search criteria.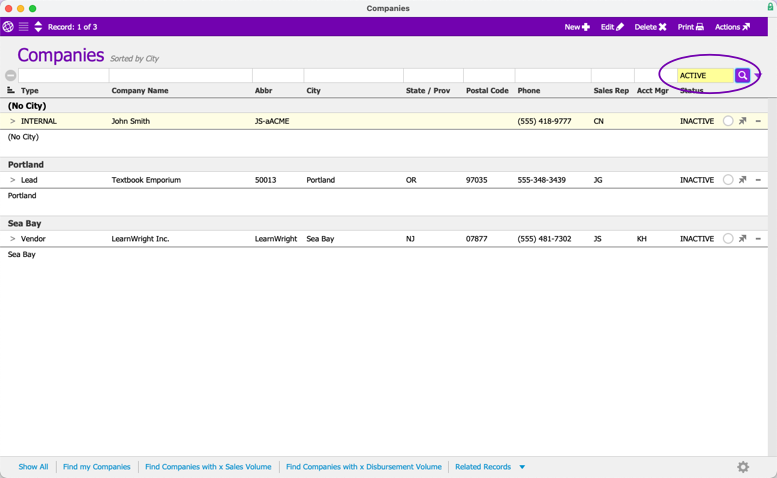
- Press the Enter key.
This updates the found set, showing active companies, still sub-summarized by city. Note that the Status Indicator for an Active company is a green circle.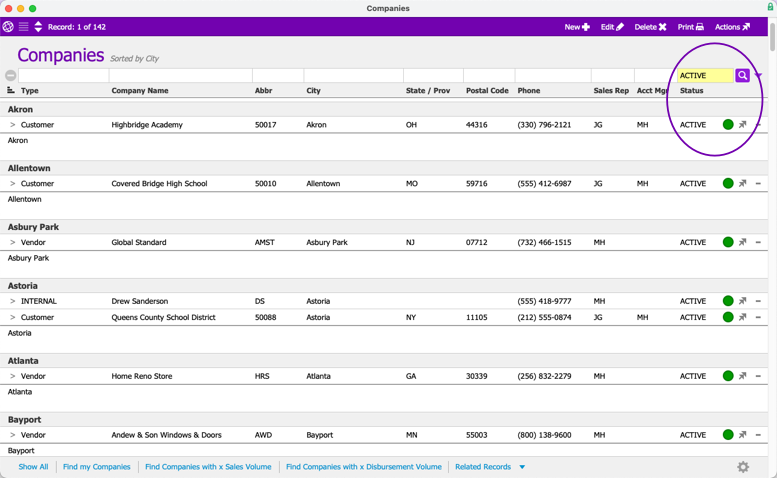
- In the Quick Search bar, click the Type field and select Customer; in the State/Prov field type "NY", then press Enter.
This updates the found set using the three combined criteria. aACE displays all the company records that are flagged as customer companies AND are located in New York City AND are Active companies. Adding criteria in one field does not replace existing criteria in another field.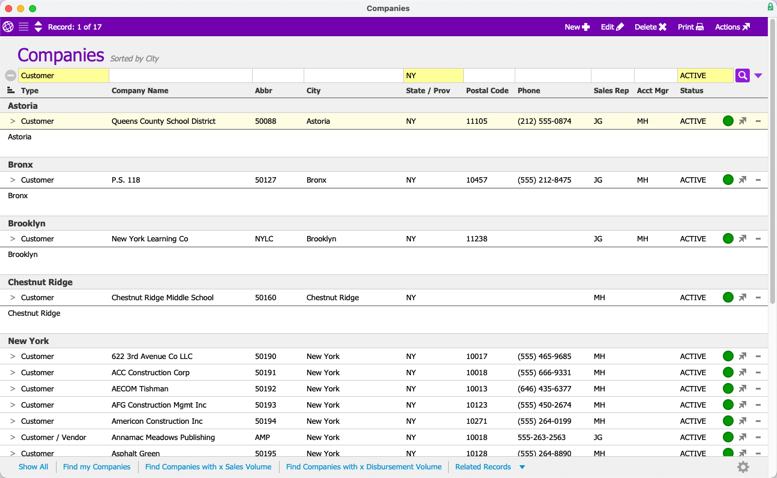
- At the left end of the Quick Search bar, click the Clear button (
 ).
).
This removes all criteria in the Quick Search fields, but does not update the found set.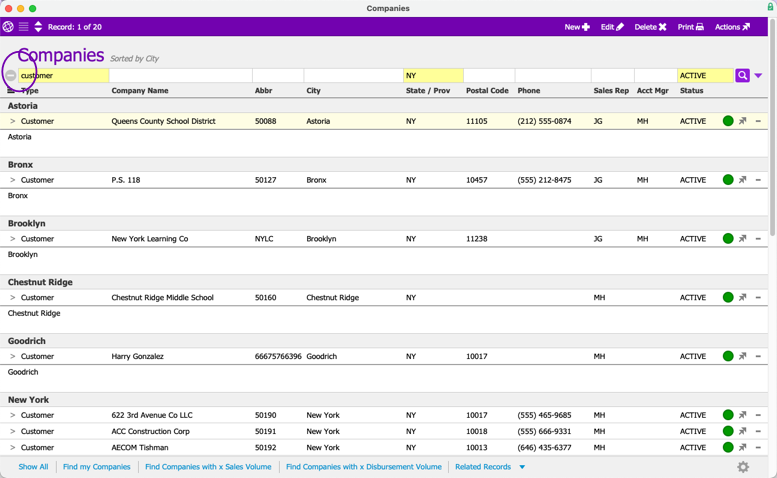
- In the footer, click the Quick Search link to Find Companies with x Sales Volume.
This displays a popup that prompts you to specify details for the search.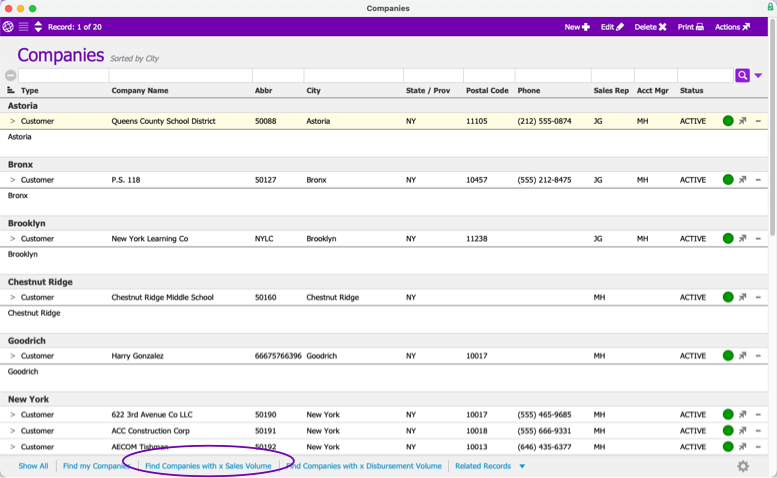
- Change the Volume criteria to 100, then click OK.
This updates the found set, showing only companies that have sales volume greater than or equal to the amount you enter.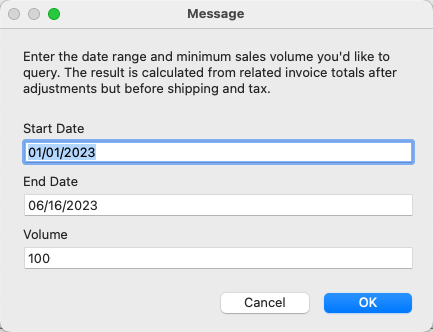
- In the Quick Search bar's City field, enter "Chicago". Then, click the Search Options button (
 ).
).
This button displays additional methods for running searches.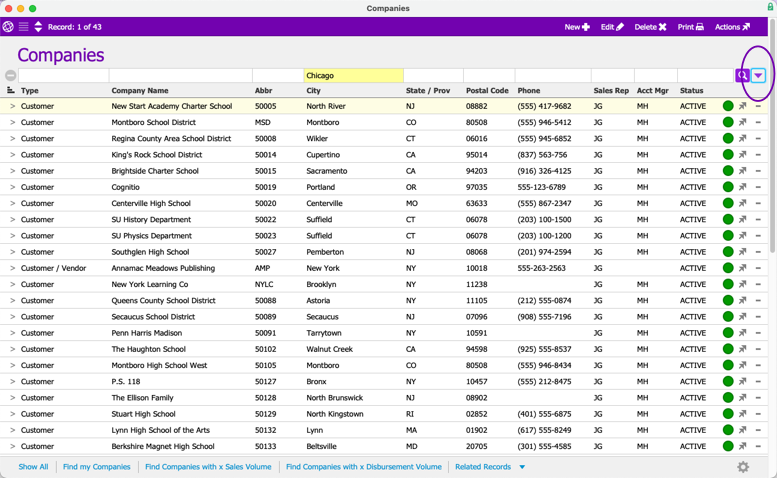
- In the Search Options dropdown list, click Search Current List.
This further refines the results that are in your found set. It reduces the number of companies, displaying only those from the previous found set that also match this new criteria.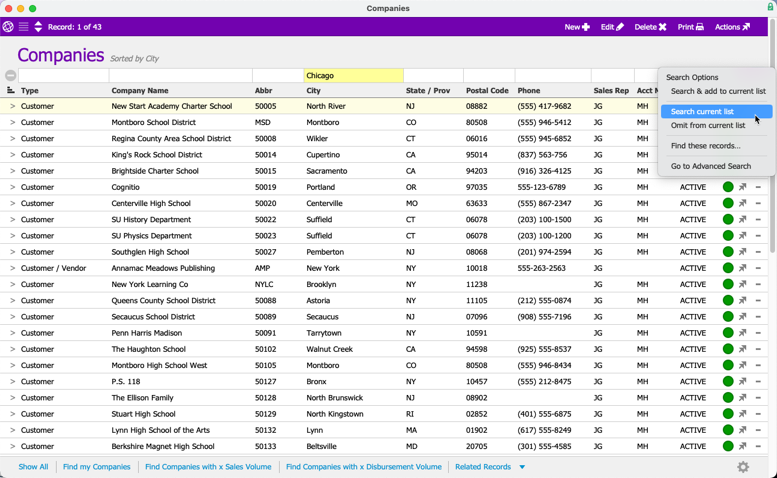
- In the footer, click the dropdown arrow to show the Related Records options.
This typically displays a list of modules that are likely to contain related records.
- In the Related Records options, click Contacts.
This opens the Contacts module list view, displaying only the contacts belonging to the companies in the Companies list view.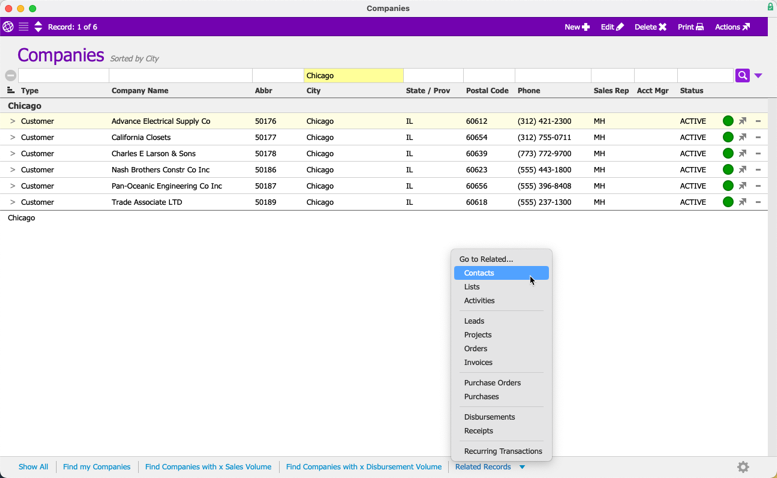
- Close the Contacts module and the Companies module.


 Note: Search fields with active criteria are highlighted in yellow. Some search fields may be grayed out. This indicates that they are non-editable and cannot be changed.
 Note: These inactive companies have a white circle on the right end of each list entry. This Status Indicator indicates the record’s status. Different records can have different Status Indicators. You can read more about


After you use the list view to locate the record(s) you want to work with, you can drill down into details by clicking the Go-To arrow (>) for a specific record. This will display that record's detail view.
Note: For additional information on features available in the List View, see our guide on the Overview of the List View.
Detail View
The aACE detail view shows the information that comprises a specific record. aACE allows you to capture a lot of data. The data for a record is organized across multiple tabs. These tabs go across the top of the screen, and an additional row of tabs might be found across the middle. You can read more about the detail view.
By default, the tabs farthest to the left are active when you first open the detail view. For example, on the Companies detail view, the Company Details tab is initially displayed on the main tabs. The Contacts tab is initially displayed on the second row of tabs.

The detail view helps you create new records or edit existing ones. You can edit most records after they have been Activated or Opened. However, it's easiest to edit Pending records.
Practicing with the Detail View
To see how the detail view functions, we'll explore some features in the Companies module. To simplify navigation, close any open aACE modules so that only the Main Menu is open.
Navigate to the Companies module (Main Menu > CRM & Sales > Companies), and click the Show All button in the footer to display all company records. Using the Quick Search bar, search for companies with a "Customer" record Type.
Click the Go-To arrow (>) beside one of the company records. This will change the screen from the list view for multiple companies to the detail view for that specific company.
Once you are in the detail view:
- Click Edit in the header bar.
This puts the detail view into a mode where you can make changes to the record. Note: Most fields have a white background. This means you can edit the data there. However, note that the Referral Contact field has a light gray background. This means you cannot type directly in that field. To add a referral contact, you can click the Selector icon (
 ) to the right of the field to display the Contacts Selector.
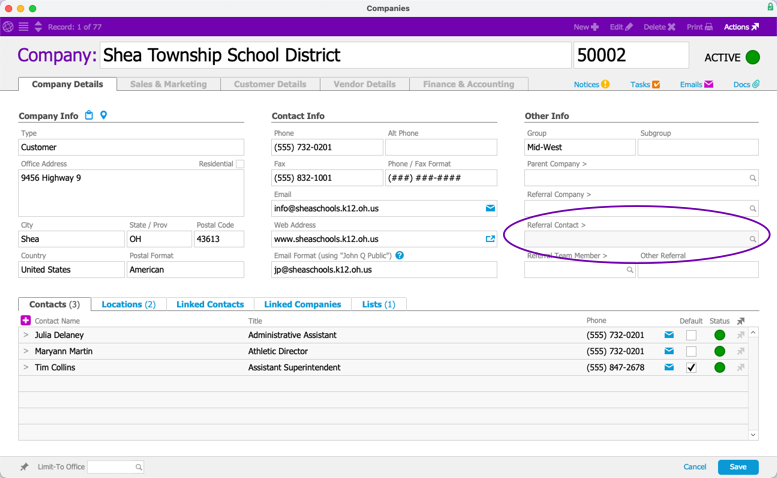
- On the detail view footer, click Cancel.
This returns the record to read-only mode without saving any changes.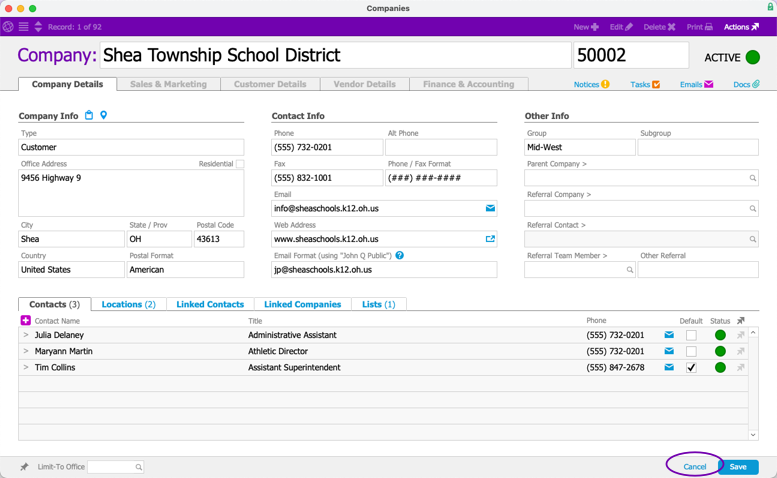
- On the detail view header, click New, or enter Control / Command-N.
This creates a new company record and puts the detail view into a mode where you can make changes to the record.
- Note the following details of the new record:
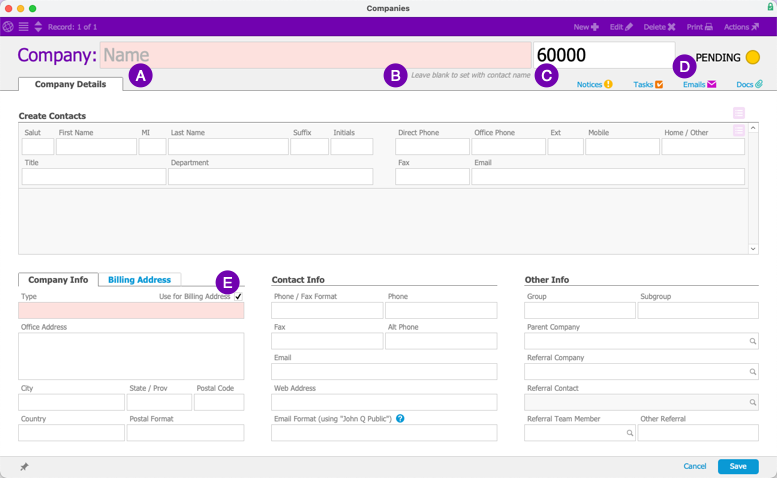
- Some fields have a pink background. This means that information is required before the record can be Opened. (You might need to click on the detail view background in order to see all fields that are highlighted as required.)
- Under the Company Name field, there is a comment pointing out how you might leverage some aACE automation for populating that field.
- The Abbreviation field auto-populates with the next number in the default sequence. You can use numbers, letters, and basic symbols for company abbreviations.
- The Status Indicator in the upper-right shows that the record is Pending.
- The Company Info section includes a flag to 'Use for Billing Address'. This flag is typically marked for a new company record. You can click on the Billing Address tab to display the fields for an alternate address. Because the flag is marked, these fields are initially grayed out, again noting that they cannot be edited.
- Fill out the two required fields for a new company:
- Company Name — Enter the name of a vendor company that your organization orders from.
- Type — Click this field and select Vendor. (If the dropdown list goes away, press the ESC key to display it again.)

- Click Save.
This triggers aACE processes to validate the record.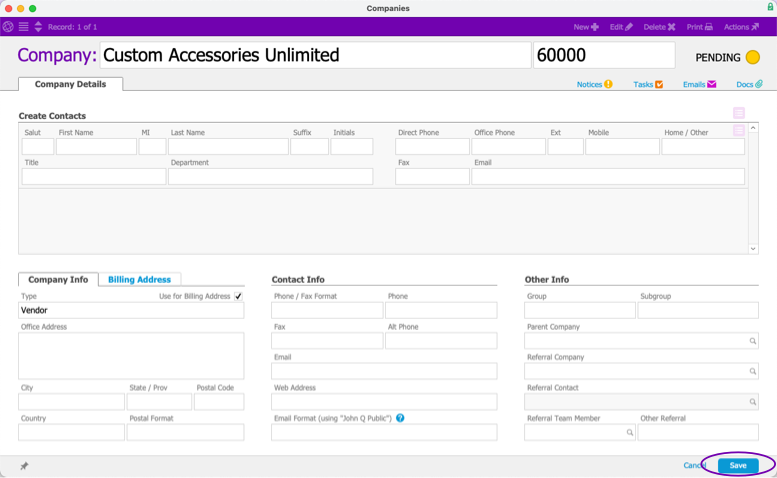 If all the required fields have acceptable data, then aACE displays a prompt for you to activate the company. If needed, resize the message box so you can easily see the entire message.
 - Click Activate.
This Activates the record and displays additional tabs where you can manage more information about the vendor.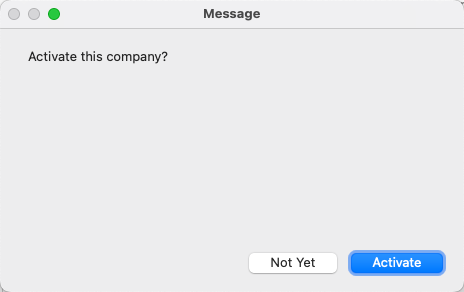
- Click through the other tabs to see what fields they contain.
Especially take note of the Vendor Details tab. The default information there will be relevant in the next training guide.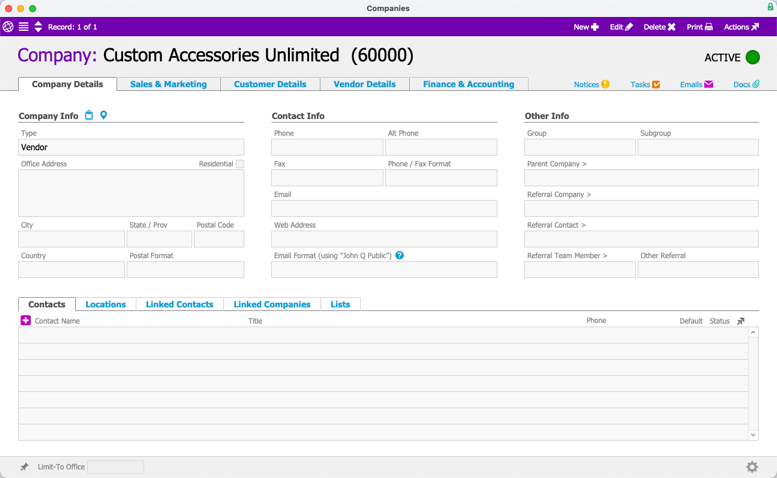
- Repeat these steps (beginning with Step #3) to create and activate another company. But this time enter the Name of a customer you sell to and set the Type field to Customer.
- Edit both your company records, entering an office address for each
These addresses can be real or hypothetical. If you enter a real Postal Code, aACE will autofill the city and state information. aACE will use this address as the default on records related to the company, unless you add other addresses on the Locations tab. - If you have any additional information you'd like to include on your vendor or customer company records, feel free to edit them accordingly.
- Jot down the name or abbreviation of the companies you created — you will be using them in the upcoming training guides.
 Note: Most fields have a white background. This means you can edit the data there. However, note that the Referral Contact field has a light gray background. This means you cannot type directly in that field. To add a referral contact, you can click the Selector icon (


 If all the required fields have acceptable data, then aACE displays a prompt for you to activate the company. If needed, resize the message box so you can easily see the entire message.

