This guide walks you through tasks for learning how to work with sales orders in aACE. It is intended for new users in the Discovery process.
Introduction
This Discovery Training guide introduces sales orders and how aACE helps automate sales processes. It will reinforce what you learned in the last training guide, while building on your knowledge of transactions. This guide will not focus on basic steps or knowledge. It presumes you are familiar and comfortable with the foundational topics already covered:
While aACE has many types of orders, this guide will concentrate on sales orders. You can check out our webinar on sales orders to learn about the different order types and more.
For this training, you will be working with the Contacts module and the Orders module. You will first create some contact records. One of these should be connected to shipping responsibilities. Another should be linked to A/P tasks. This is to highlight how aACE allows you to specify a shipping contact that is different from the Bill To contact.
Creating Contacts from the Companies Module
In your previous training with the Companies module, you created new customer and vendor companies. We will be working with your customer company. We'll add multiple contacts to the company to show how aACE helps you send the right information to the right person.
Adding Communication Methods to a Company
To begin, we'll first update the general information for communicating with this company. Keeping track of a customer's communication methods is vital for maintaining a good relationship. We will locate your customer company record and update it to include general contact methods.
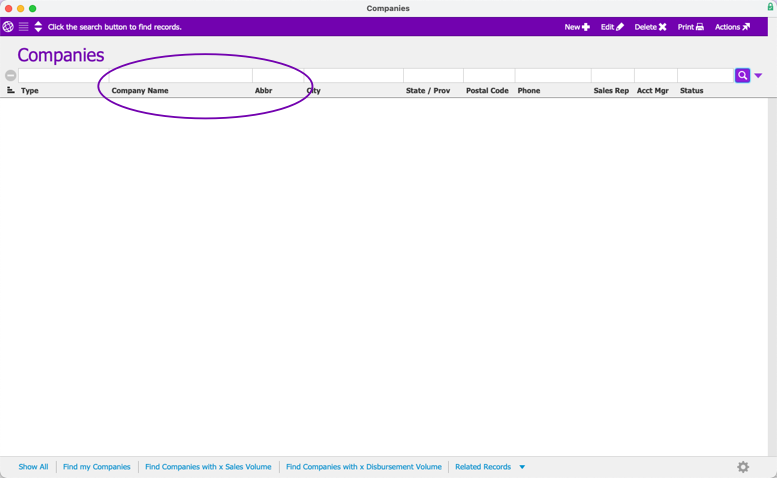
- From the Main Menu, click CRM & Sales, then click Companies. Use the Quick Search bar to search for the Company Name or Abbreviation of your customer company.
- Click your customer company's Go To arrow (>).

- From your customer company's detail view, click Edit.
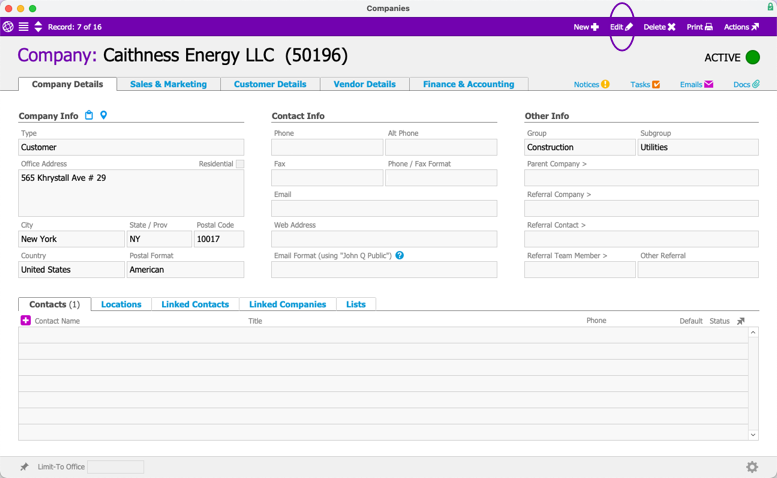
- In the Contact Info section, enter real or hypothetical contact information, including a phone number, an email address, and a website URL. Click Save.
 Note: The Phone / Fax Format and Email Format fields allow you to configure aACE so the system can help you enter data more consistently. You can specify the default formatting for postal and phone number fields. For details on how to use the Email Format field, click the Info icon (
 ).
).


 Note: The Phone / Fax Format and Email Format fields allow you to configure aACE so the system can help you enter data more consistently. You can specify the
  ).
).Creating a New Contact for a Company
In tandem with the Companies module, the Contacts module helps you manage information about the individuals you interact with at an organization. You can link multiple contacts to a company. You will create a new contact for this customer directly from the company record.
- From your customer company record, be sure the Contacts tab is displayed. In the Contacts section, click the Add icon (
 ).
). This opens the Contacts module with a new contact record ready to edit. The record is automatically linked to the customer company record. At the new contact record, note the following details:
- The Key Contact flag designates a contact as a focal point for communications with the company. aACE will bold a key contact's name in lists of contacts. You can mark this flag for multiple contacts within an organization.
- aACE autofills some information from the company record, using the address and communication methods you entered. This data is noted by italicized text.
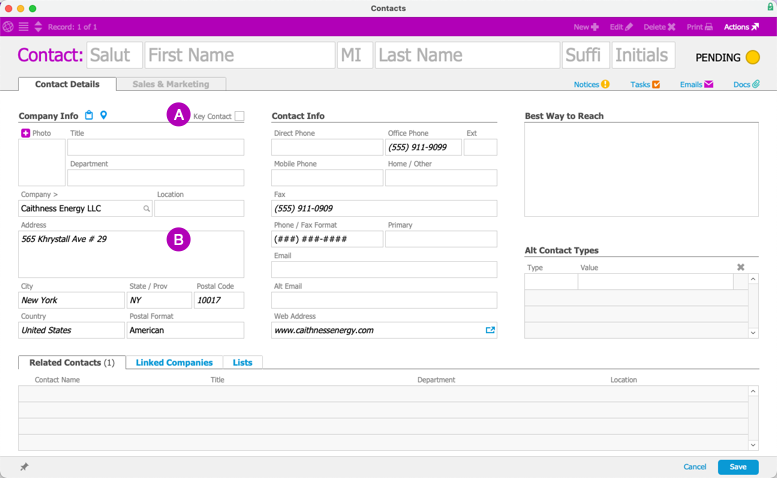
- Enter data for First Name, Last Name, Title, and Department.
You can use an actual contact from your customer company or enter hypothetical data. For some of the following demonstrations, we suggest creating a contact related to shipping workflows (e.g. Warehouse Manager, etc).
- Click Save.
aACE validates the data, then prompts you to activate the contact. - Click Activate.
aACE updates the record status to Active. - Close the Contacts module and return to the Companies module.
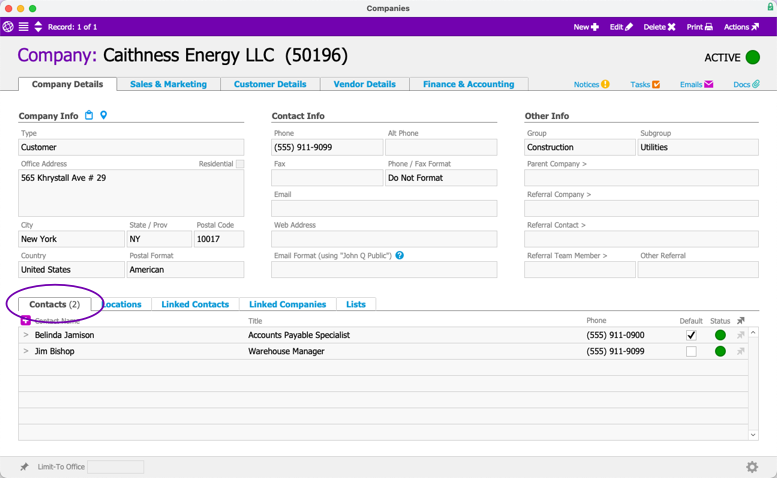
aACE lists the new contact on the Contacts tab.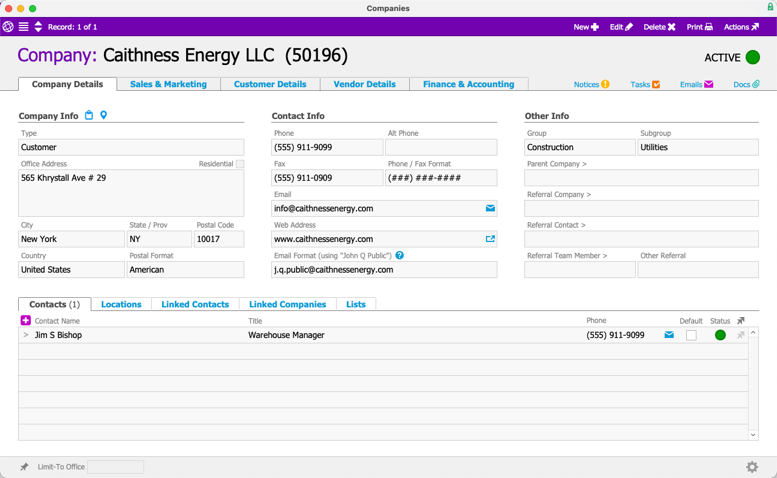
- Mark the flag to identify your new contact as the Default.
This flag designates the primary contact for this company. When you link a company to another record (e.g. a sales order), aACE will autofill this contact's information. You can mark only one contact as the Default.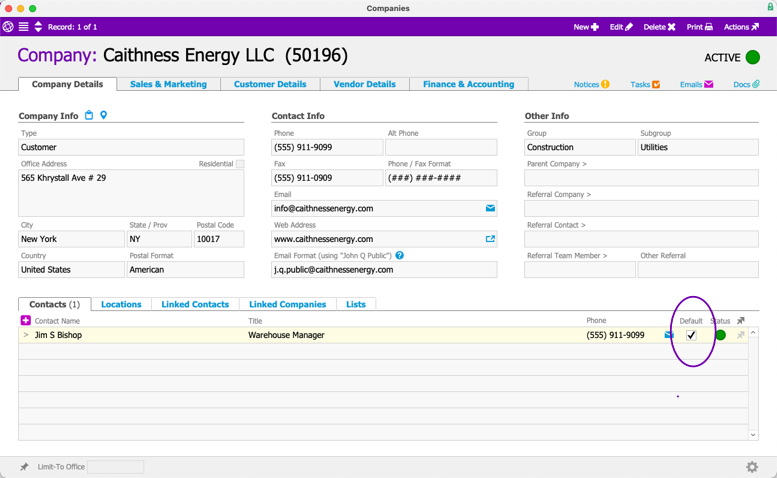
- Repeat these steps to create and activate a second contact. We suggest creating a contact related to billing workflows (e.g. Accounts Payable Specialist, etc). Then update the Default assignment so your A/P Department contact is the default.
 Note: Only one contact can be flagged as the Default. Typically this is the person who other aACE users would reach out to for answers to questions.
 This opens the Contacts module with a new contact record ready to edit. The record is automatically linked to the customer company record. At the new contact record, note the following details:


 Note: Only one contact can be flagged as the Default. Typically this is the person who other aACE users would reach out to for answers to questions.
Orders
The Orders module allows you to view, manage, and fulfill orders. It is one of the most important screens in your aACE system. aACE includes functionality for multiple types of orders (i.e. sales, production, and service). These three types prioritize certain features that are most helpful for certain businesses. This training guide will focus on sales orders. The sales order type easily demonstrates key features that the other order types share.
Creating a Sales Order
Creating a new sales order involves the same general steps for creating records that you've practiced so far. As we work with sales orders, we will be using line item codes (LICs) from the sample data in your Discovery system.
- From the Main Menu, click Order Management, then Orders. At the Orders module header, click New.
This displays a popup menu where you can select from the various Order record types.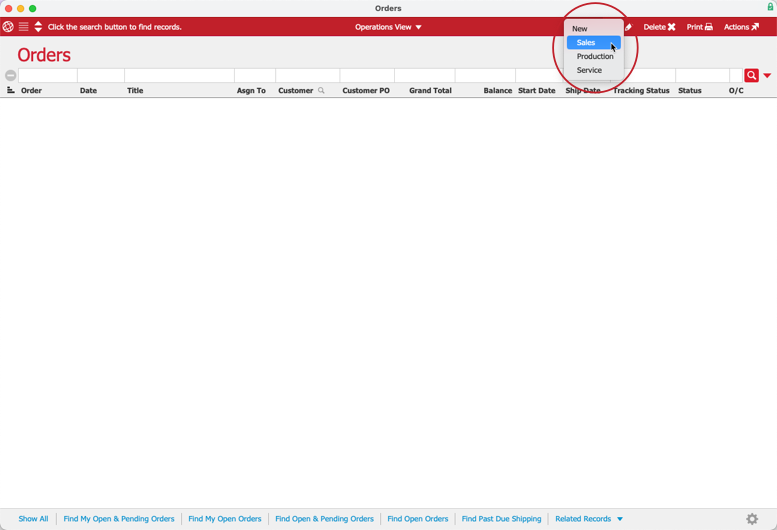
- Click Sales.
This creates a new sales order record. The Bill To company selection popup is displayed and required fields are shaded pink.
- In the Bill To company selection popup, begin typing the name of the customer company you created to activate aACE type-ahead, then press ENTER.
aACE populates the fields with the address and Default contact from the company record.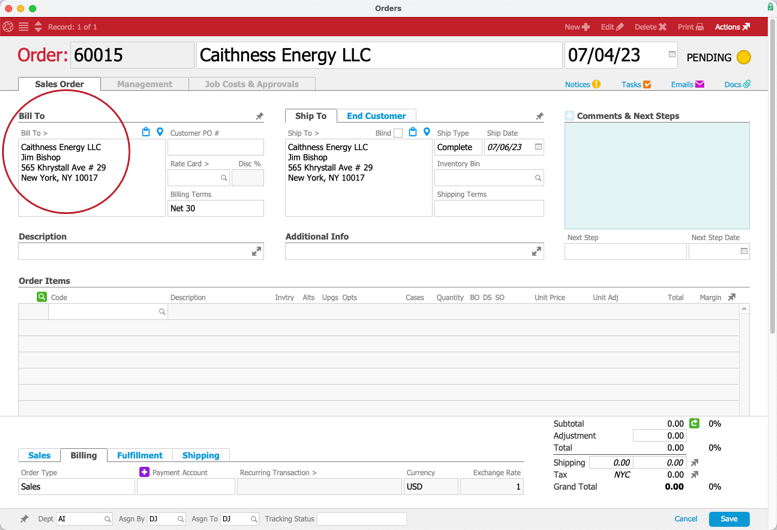 Note: The Ship To address initially matches the Bill To address. By default, aACE uses the primary address and the Default contact for both Bill To and Ship To sections.
 - Click the Bill To field again.
This displays the Bill To popup. - Click the Contact field, enter the initials for the contact you created related to billing workflows, then press ENTER.
This updates the contact for the billing information, but leaves the shipping contact unchanged. Note: You can also specify when certain contacts should be used by entering more information on a company record's Contacts or Locations tabs.
 - In the Order Items section, use the LIC selector (
 ) to locate and select TBLT-7, then save the selection.
This adds the LIC to the Order Items list.
- Hover your mouse cursor over the order item's Unit Price field.
This displays a calculation tooltip that summarizes how the cost or price of an item was calculated. You can also review the relevant calculations this way in the Unit Adj, Total, and Margin fields.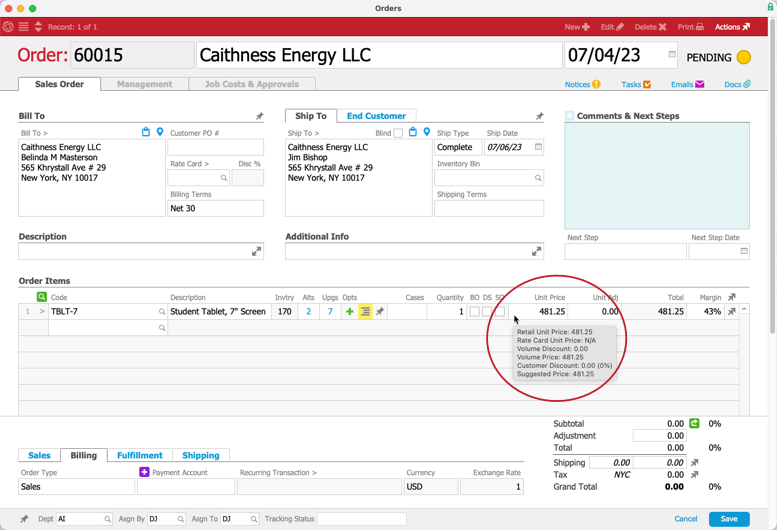
- Click the blue highlighted number in the Alts column.
This displays the Options Selector where you can choose an alternate LIC. Alternates replace the item currently listed on the order. Alternates can be useful when there is insufficient inventory for the initial LIC.
- In the Options Selector, select TBLT-8 and click Save.
aACE removes the TBLT-7 LIC and enters the TBLT-8 LIC, updating the pricing.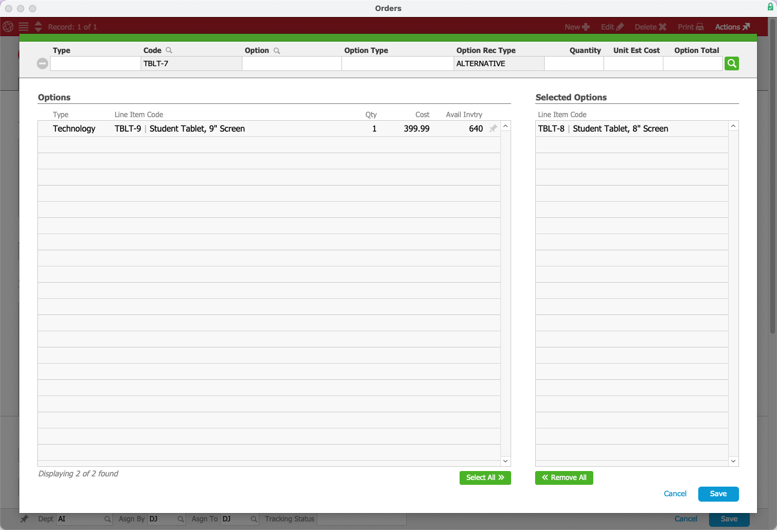
- In the Order Items section again, click the blue highlighted number in the Upgs column.
This displays the Options Selector where you can choose an upgrade LIC. Upgrades are added to the order as child items under the initial item. Upgrades can be used to add value on a customer order.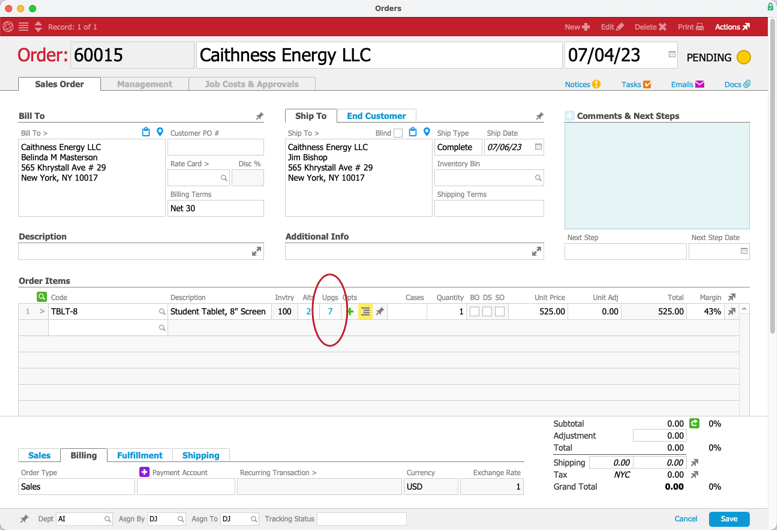
- In the Options Selector, select TBLT-8C and click Save.
This adds the new LIC under the initial TBLT-8 line, with the Description indented. The TBLT-8 becomes a 'parent' item, while the TBLT-8C becomes a 'child' item. Note: You can also have aACE automatically add upgrade items by configuring the LIC record.
 - From the order record, click Save.
aACE runs validations and prompts you to open the order. - Click Not Yet.
aACE keeps the order in Pending status. - In the header bar, click Print, then Print this View.
This displays a print preview of the order. Because the order is in Pending status, the order printout displays 'QUOTE' in the top-right corner.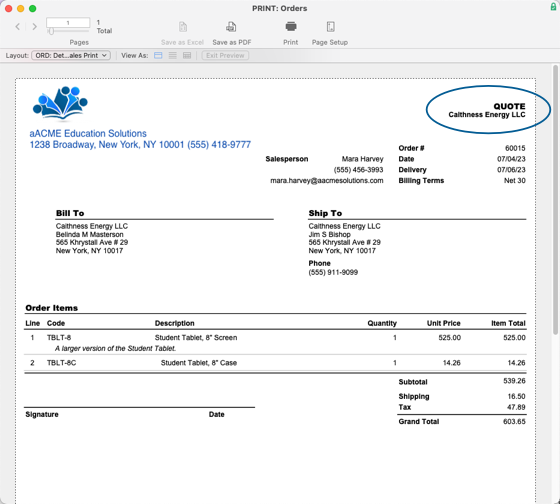
- Close the print preview.
- In the order record header bar, click Actions, then Open.
aACE runs validations and prompts you to open the order. - Click Open again.
aACE moves the order to Open status. - In the header bar again, click Print, then Print this View again.
This displays the preview again. Because the order is now in Open status, the order printout displays 'SALES ORDER' in the top-right corner. An Open order in aACE means the record is legitimate, in process, and can only be edited in limited ways. Close the print preview. Take note of your customer company. In the next phase, you will continue processing this customer's order, using the Shipping Log module.


 Note: The Ship To address initially matches the Bill To address. By default, aACE uses the primary address and the Default contact for both Bill To and Ship To sections.
  Note: You can also specify when certain contacts should be used by entering more information on a company record's Contacts or Locations tabs.
 ) to locate and select TBLT-7, then save the selection.


 Note: You can also have aACE automatically
 Close the print preview. Take note of your customer company. In the next phase, you will continue processing this customer's order, using the Shipping Log module.
Shipping a Sales Order
On an order's detail view, aACE provides multiple tabs for viewing progress and managing the order. For example, clicking the Management tab initially displays the Overview tab.

The Overview tab for a sales order is similar to the Overview tab for managing a PO. It provides a good deal of information about shipments and invoices. In this training guide, you'll work more with the Shipping & Receiving tab. Invoicing will be addressed in a later training guide.
Basic Shipping & Receiving
The Shipping and Receiving tab shows additional details about progress on an order's shipment(s). Note: Your Discovery system is configured to automatically generate shipments for open orders. This setting can be changed in aACE's Shipping preferences.
Let's fast-forward to when your fulfillment staff need to prepare the ordered product for shipping. If you have any aACE windows open, feel free to close them first.
- From the Main Menu, click Order Management, then Shipping Log.
This displays the Shipping Log module list view.
- In the Shipments section, click the Go-To arrow (>) for the shipment to your customer.
This shows the detail view for the outgoing shipment. For this training, we will process the shipment as-is.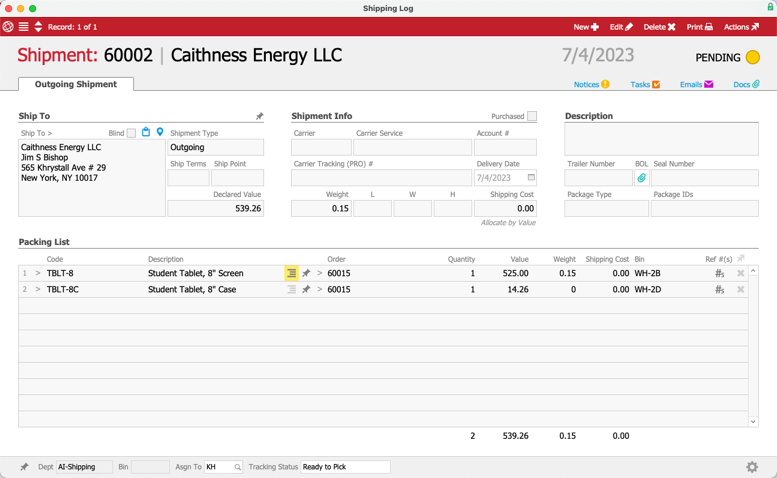
- In the header bar, click Actions and Ship.
aACE runs validations and prompts you to mark the shipment as Shipped. - Click Yes.
aACE processes the shipment and updates the status to Shipped. - Close the Shipping Log module and return to the Order module.
The Shipping & Receiving tab also shows that the shipment is Shipped and the order as Closed.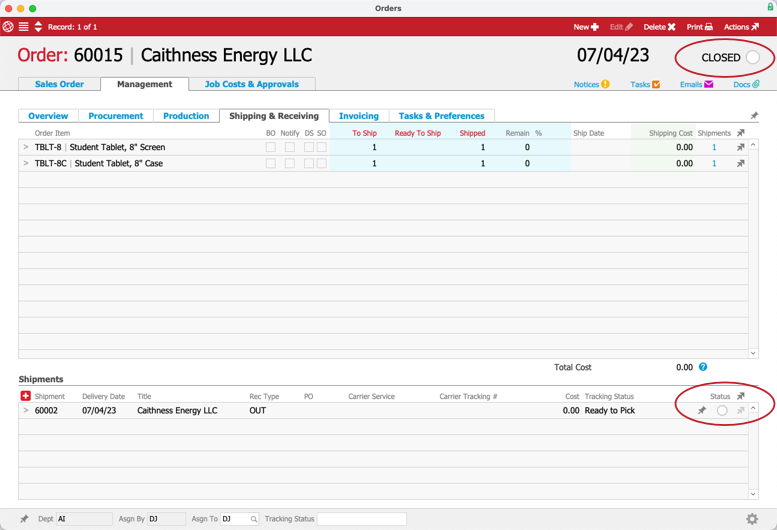 Note: aACE system preferences can help you automate standard tasks. For example, your Discovery system is configured to automatically generate invoices and to close orders. When you mark a shipment as Shipped, aACE auto-generates the invoice. This invoice number is noted on the shipment record's footer. When an order has an invoice in Open status and has no remaining product to ship, aACE auto-closes the order. You can configure these features using aACE's Billing preferences.


 Note: aACE system preferences can help you automate standard tasks. For example, your Discovery system is configured to automatically generate invoices and to close orders. When you mark a shipment as Shipped, aACE auto-generates the invoice. This invoice number is noted on the shipment record's footer. When an order has an invoice in Open status and has no remaining product to ship, aACE auto-closes the order. You can configure these features using
 Alternate Shipping Methods
aACE supports other workflows for delivering product to your customers.
Drop Shipping
Drop shipping (DS) is typically used to send product from a vendor directly to your customer. aACE generates and sends a PO to the vendor, with the customer's address as the Ship To address. Your business basically handles the purchasing tasks for the customer.
To demonstrate this functionality, we'll run through the process for creating a sales order again, focusing on the steps for flagging items as drop shipped. Then we'll process the PO so the sales order progress can continue.
- At the Orders module, click New > Sales.
- At the Bill To company selection popup, enter your customer company.
On the order record, note that the Ship To section includes a flag labeled Blind. You can read more about blind shipping in the Overview of Orders guide.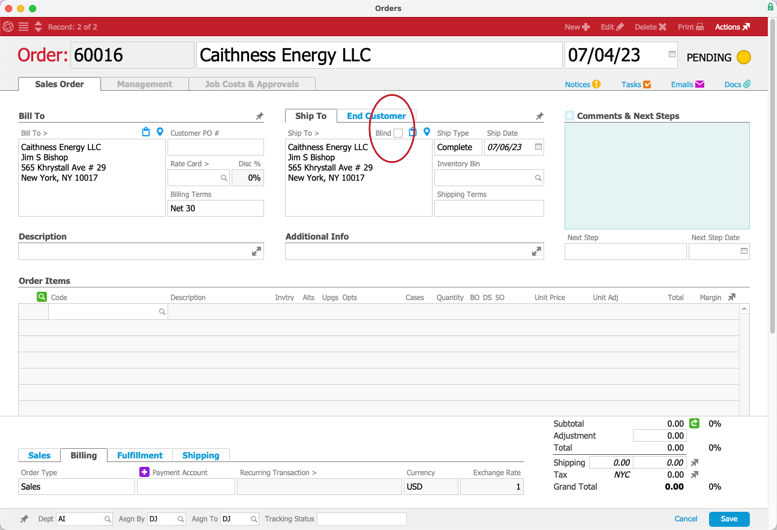
- In the Order Items section, search for and add one of the LICs that you created in the Purchase Orders training guide.
- Make sure the Qty and Unit Price have info, then mark the flag for DS.
This tells aACE the item needs to be drop shipped.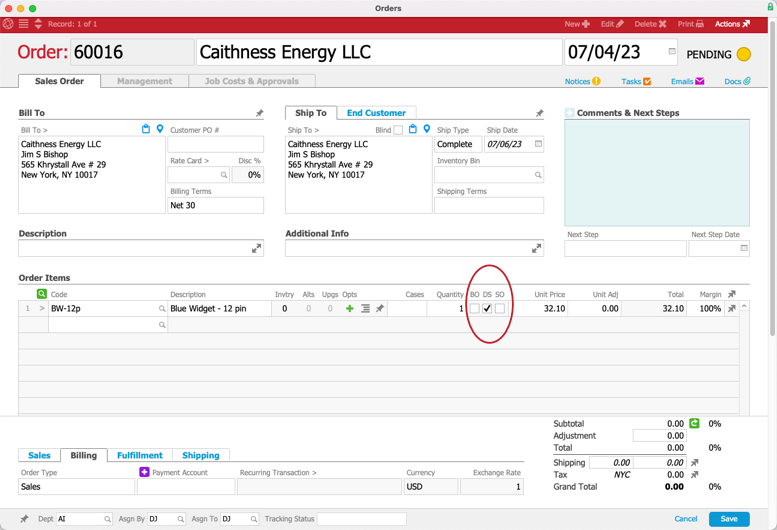
- Click Save and Open.
- Click the Management tab.
The Overview tab shows the Procured column with a value. This reflects the DS item that needs to be procured.
- Click the Procurement tab.
This shows the PO to the LIC's vendor that aACE generated when you opened the sales order. aACE auto-fills your customer's address in the Ship To address of that PO. Note: aACE will not auto-generate a shipment for this order. The shipment will be prepared by the vendor, addressed to your customer.
 - Click the Go-To arrow (>) for the auto-generated PO.
This displays the Purchase Orders module, showing the detail view of this PO and the Ship To address for your customer company.
- In the PO module header bar, click Actions > Open.
- When you see the confirmation dialog, click Open.


 Note: aACE will not auto-generate a shipment for this order. The shipment will be prepared by the vendor, addressed to your customer.
This workflow would continue with processing the purchase, as covered in the Purchase Orders training guide. To further enhance drop shipping, you can add more details to an LIC record. For example, you can set vendor-specific part numbers, codes, or product descriptions that aACE will include on PO records to that vendor.
Special Orders
Special order (SO) items are typically used for handling product that you do not keep in stock. For example, a customer might order an assembled item which requires parts you don't regularly stock. A PO is generated from the order for that special order part. The part is shipped to you to be inspected or assembled before you ship the final product to the customer.
To demonstrate this functionality, we'll again run through the process for creating a sales order, focusing on the steps for flagging items as special ordered. Then we'll process the PO so the sales order progress can continue.
- In the Orders module, click New > Sales.
- From the Bill To company selection popup, enter your customer company.
- In the Order Items section, search for and add the LIC you created in the Purchase Orders training guide.
- On that line, make sure the Qty and Unit Price have info, then mark the flag for SO.
This tells aACE the item needs to be special ordered.
- Click Save and Open.
- Click the Management tab.
In the Overview tab, note that the Procured column has a value. This reflects the SO item.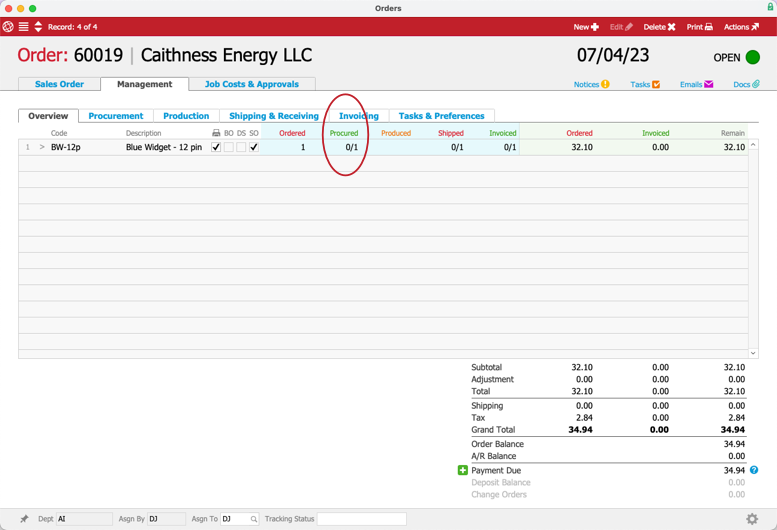
- Click the Procurement tab.
This shows the PO to the LIC's vendor that aACE generated when you opened the sales order. aACE auto-fills your company address in the Ship To address of that PO.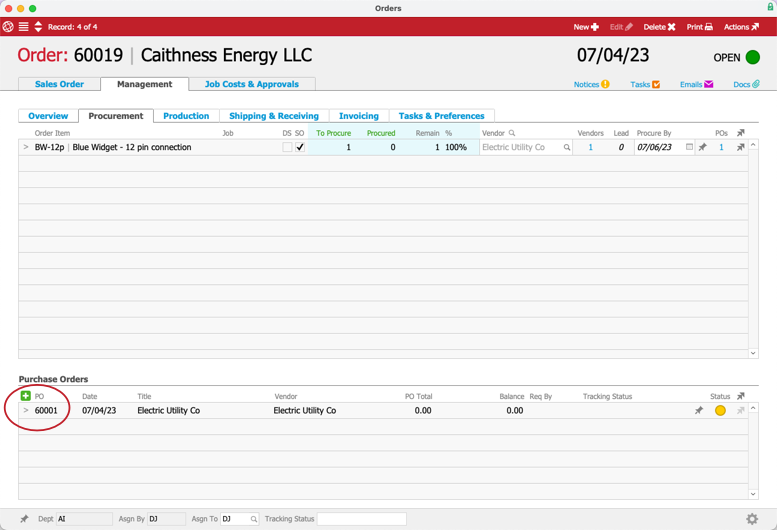
- Click the Go-To arrow (>) for the auto-generated PO.
This displays the Purchase Orders module, showing the detail view of this PO. Note that the Ship To address is your company.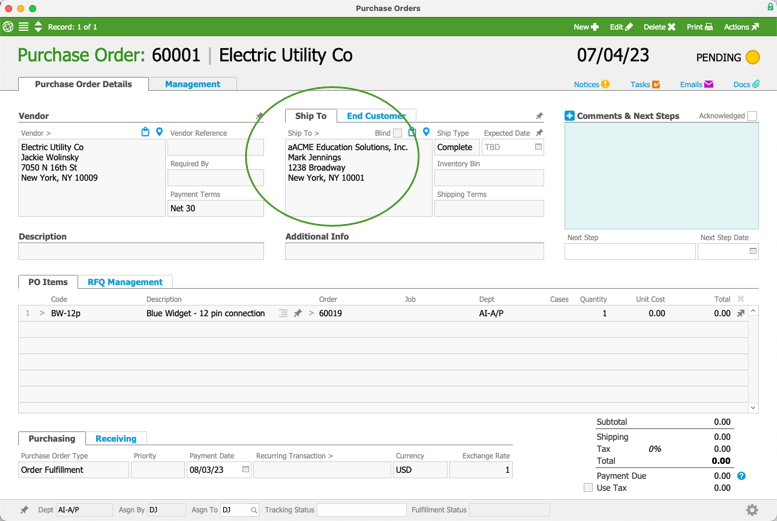
- In the PO module header bar, click Actions > Open.
- When you see the confirmation dialog, click Open.
- In the PO record detail view, click Management > Shipping & Receiving.
aACE does not auto-generate an incoming shipment record for the special order item. You or a member of your warehouse team must receive the incoming shipment manually. Below we will review a slightly different workflow than what you learned in Discovery Training: Purchase Orders to receive this shipment. - Click the line-level Actions (
 ) for the PO item, then click Receive Item.
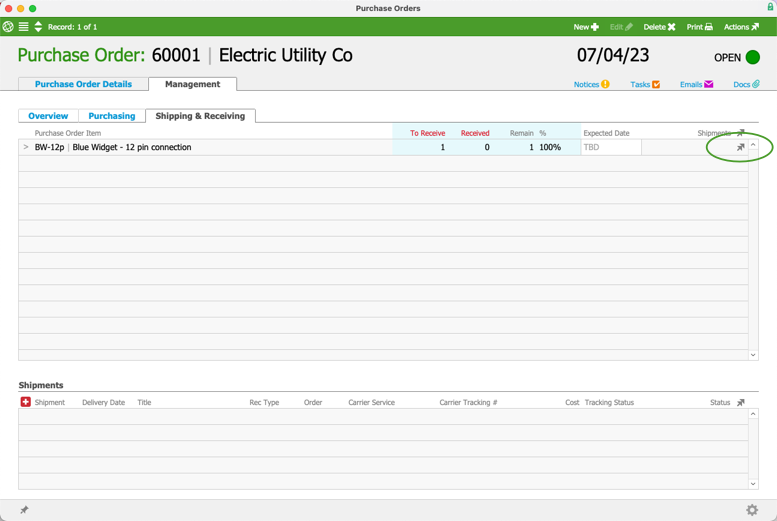 This displays the Shipping Log module, showing the incoming shipment for your SO item in Edit mode. The shipment is automatically linked to the initial sales order and to the PO.
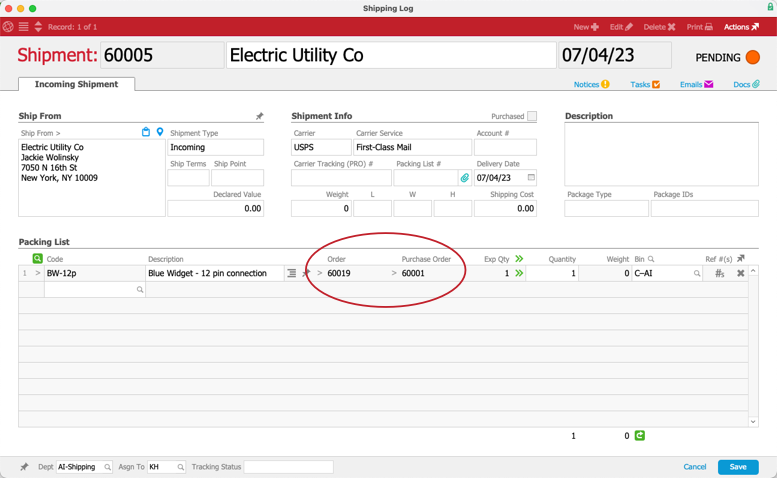
- Click Save, then click Yes.
aACE marks the shipment as Received. - Close the Shipping Log module and the Purchase Orders module.
- In the initial sales order, click the Shipping & Receiving tab.
This shows the Shipments section with the two relevant shipment records. Note: In the Shipments portal, the Rec Type column labels the first shipment as 'IN' and the second shipment as 'OUT'. The 'IN' shipment represents receiving the SO item from the vendor. The 'OUT' shipment represents sending the SO item to the customer. Once you mark the incoming shipment as Received, aACE auto-generates the outgoing shipment.
 - To finish this workflow, navigate to the outgoing shipment and mark it as Shipped.
This prompts aACE to auto-generate the invoice. Once that invoice is in Open status, the original order will be marked Closed. (We will discuss more details about invoicing in a subsequent guide.)


 This displays the Shipping Log module, showing the incoming shipment for your SO item in Edit mode. The shipment is automatically linked to the initial sales order and to the PO.
 Note: In the Shipments portal, the Rec Type column labels the first shipment as 'IN' and the second shipment as 'OUT'. The 'IN' shipment represents receiving the SO item from the vendor. The 'OUT' shipment represents sending the SO item to the customer. Once you mark the incoming shipment as Received, aACE auto-generates the outgoing shipment.
 Ship Types
aACE supports multiple Ship Types that you can specify on an order. These settings specify how the customer will receive their order items:

- Pick Up — The customer will come to your facility in person and receive their items.
- Complete — No order items will be shipped until all items are ready for shipment.
- Partials OK — Multiple shipments may be sent out as order items become available. This is typically relevant when you have some of the needed product in stock, but the rest is on backorder.
- N/A — No shipping is needed. This setting is used often for made-to-stock production orders. In a sense, your company is the customer for these orders. The order is needed to track the production effort, but the finished items will not be packaged and shipped to another organization.
Additional Tasks for Outgoing Shipments
In some situations, there may be other tasks needed before an outgoing shipment is ready. Typically, these are production tasks on a production order. aACE would wait for these tasks to be marked Complete, then generate the outgoing shipment. These workflows are discussed more in the subsequent guide for Discovery Training: Production.
Third-Party Shipping Solutions and aACE Apps
aACE includes a handful of mobile apps and integrations related to shipping your products. aACE's Pick App is an app for your warehouse team to pick and log product shipments. Additionally, aACE can integrate seamlessly with other shipping software to help streamline your workflows. aACE+ NRG, aACE+ ReadyShipper, and aACE+ ShipStation provide support for UPS, FedEx, USPS, and a variety of LTL carriers. You can read more about choosing a shipping solution if you do not yet have one or are considering switching your shipping solution.
These topics are covered in further detail later in the process. For now, be sure to check our webinar about the aACE+ ShipStation integration.
Test Your Understanding
After working through the tasks in this training guide, use this online exam to see how well you understand these aACE features: Sales Orders Discovery Training Quiz
