This guide walks you through tasks for learning how to work with production in aACE. It is intended for new users in the Discovery process.
Introduction
aACE’s production engine supports a wide variety of workflows. In this Discovery Training guide, you will work with some of aACE's most important production features. You will use line item codes (LICs), production orders, and production jobs and tasks to learn how aACE handles production.
This Discovery Training guide supplements our webinar on aACE Production. For additional insight about your aACE system, please also watch the webinar.
This guide will not focus on basic steps or knowledge. It presumes you are familiar and comfortable with the foundational topics already covered:
Unique Aspects of Production
Line Item Code Types
As mentioned in previous training guides, aACE provides multiple types of LICs. Two of these are particularly relevant to production activities.
- Assembly Items — These are products that you produce for customer orders, but you do not accumulate as inventory.
- Inventoried Assembly Items (IAIs) — These are products that you produce and keep on hand. They could be stored for later sales or for use in additional production tasks.
The distinction between these two LIC types is also referred to as made-to-order (i.e. assembly items) versus made-to-stock (i.e. inventoried assembly items).
A key detail about assembled products is pricing. Your costs for LICs that are Items and Inventoried Items are typically determined by your vendor. Then the price for your customers is determined by the margin or markup you specify on the LIC record. In contrast, the cost for Assembly Items and IAIs is determined by your bill of materials (BOM). The BOM tracks everything that goes into the assembly, including both materials and labor. Then you can set the price for customers by margin or markup.
Order Types
As noted in previous training guides, aACE supports multiple order record types. This includes production orders. Production orders highlight details that are important for manufacturers that produce made-to-stock items and their unique workflows. Your aACE representative can work with you to identify which aACE production features will be best for your organization. You can also read more about the differences between sales orders and production orders.
Practicing with Production Features
To explore the unique aspects of production orders, you'll first create your own assembly item. Then you'll create a production order and process the tasks to manufacture two separate assembly items. You will work with existing sample data in your Discovery system. Later, your aACE system will be populated with company-specific data.
Create an Assembly Item
The sample product data in your system includes several assembly items. Creating a new assembly item will demonstrate how aACE determines the cost of the completed product and allows you to specify the markup or margin.
- Navigate from Main Menu > Inventory > Line Item Codes.
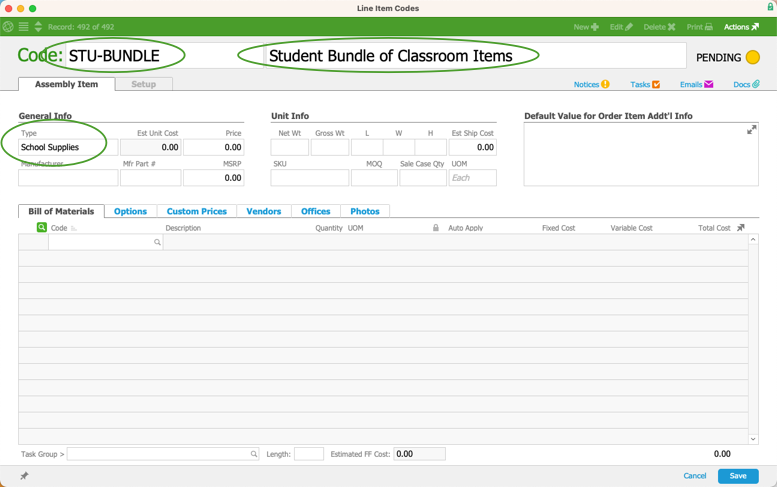
- In the header, click New > Assembly Item.
This displays the detail view showing the basic LIC fields and the Bill of Materialstab. - Enter data for the required fields: Code, Description, and Type.
- Click the Bill of Materials Search icon (
 ).
). - At the Order Items Selector, use the Rec Type search field to locate ITM-INV records.
- Use the Type search field to refine the list.
- Click at least two of the LICs.
This moves them to the Selected LICs list on the right.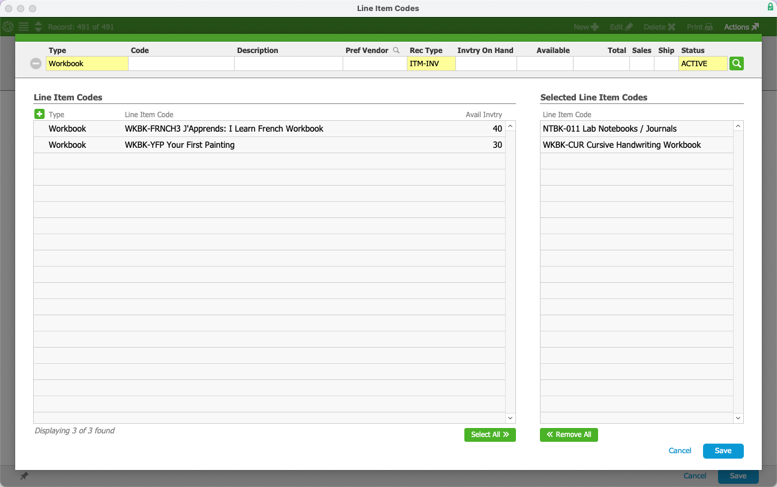 Note: This is an exercise to review production functionality. So these items do not have to be realistic components for a larger product. When your aACE system is loaded with your business data, the assembly items will be built accurately.
 - Click Save.
- At the Bill of Materials tab again, enter a Quantity for each item.
aACE draws the Variable Cost from each LIC record to calculate the Total Cost for each line. - Mark the Auto Apply flag for some of the items you selected.
This optional flag tells aACE to use the same amount of the inventoried item every time this assembly item is created. - Click the Options tab.
This shows the upgrades you have linked to this assembly item. - Click the Search icon () again, then select a few other ITM-INV records and click Save.
This moves your selected items to the Options list. 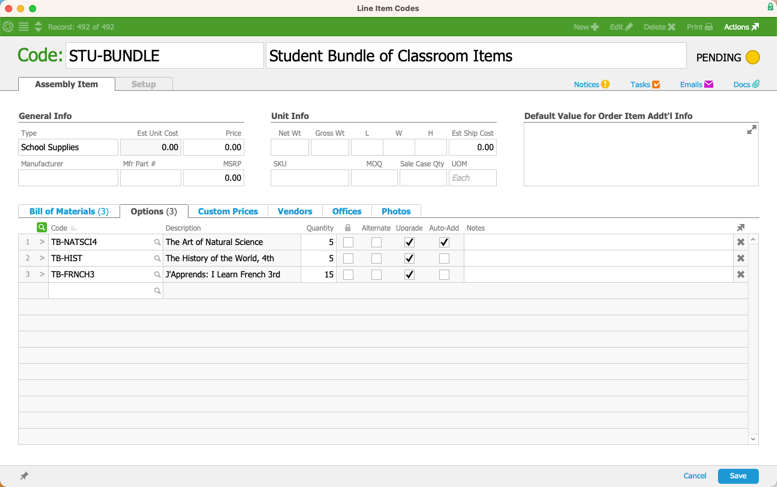 Set the Quantity for the selected items and mark the Auto-Add flag for at least one of them.
Note: The Auto-Add flag tells aACE that this option should be added under your assembly LIC every time the assembly is included on an order. You can manually remove the item when you prepare the order.- Click Save, then at the prompt to activate the LIC, click Not Yet.
- Click the LIC's Setup tab, then click Edit in the header bar.
- In the Commissions and Rate Setup section, specify how aACE should calculate the price:
- Rate Type — Markup %
- Rate Value — 100%
aACE automatically calculates value for the Price field.
- Click Save, then at the prompt, click Activate.
aACE calculates the total cost for this Assembly Item by adding up the costs for all the component LICs on the Bill of Materials.

 ).
). Note: This is an exercise to review production functionality. So these items do not have to be realistic components for a larger product. When your aACE system is loaded with your business data, the assembly items will be built accurately.
  Set the Quantity for the selected items and mark the Auto-Add flag for at least one of them.
Now you can add this Assembly Item on a production order.
Create a Production Order
When you create a production order, you will notice some differences from the sales order layout. For example, the sales order includes a Unit Adj field for each order item, while the production order includes a Subcosts field. The subcosts are the costs of components that contribute to the total cost of the parent item or finished good.
- Navigate from Main Menu > Order Management > Orders.
- In the header, click New > Production.
- Select your customer company.
- Click the Order Items Search icon (
 ).
). - At the Order Items Selector, use the Rec Type search field to locate ASMBL records.
This displays both the Assembly-type items and the IAIs. This is because the search term "ASMBL" matches with both record types. - Edit your search criteria, adding two equals signs in front of it (i.e. "==ASMBL").
This search operator constrains the results to exact matches of the text value. - Click the HP Printer Pack Special and your new assembly item that you created.
This moves the assembly items to the Selected LICs list on the right.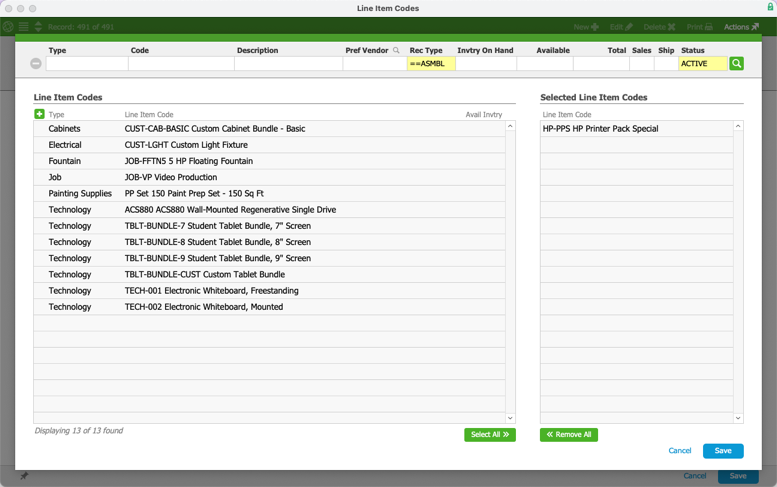
- Click Save.
This adds the selected items to your order, plus the item(s) you flagged with the Auto-Add option. - At the Order Items list, enter a Quantity for each item: 1 for the printer bundle; 2 or more for your new Assembly Item.
aACE calculates the total values. - On the line for your new assembly item, click the number in the Upgrades box.
This displays the Option Selector, showing the LICs and quantities you specified earlier. - Select one LIC, then click Save.
This adds the upgrade item to your order.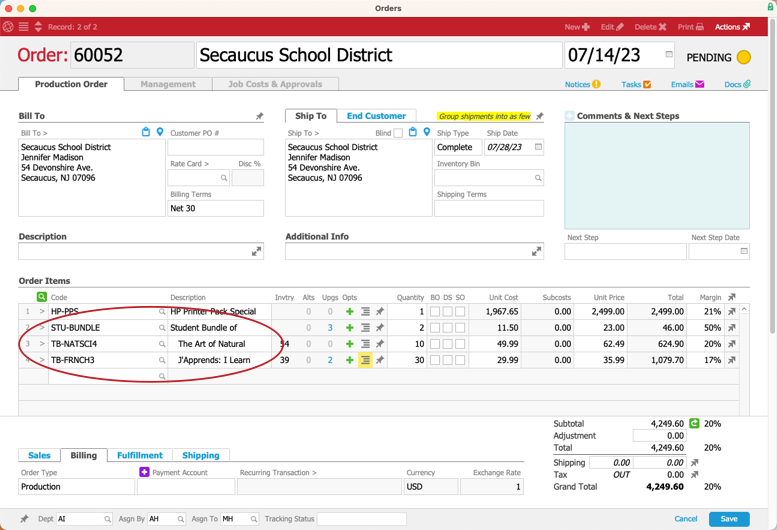 Note: If you only specified one upgrade item on your assembly item, and then you marked that item as Auto-Add, this will result in two lines showing that same LIC. You can remove LICs from the Order Items list by clicking the line-level Actions icon (
 ) and selecting Delete Order Item.
 - Update your Assembly item's child items (i.e. the items with indented text in the Description field). Change the Unit Price values to '0'. Then click the Refresh icon (
 ) in the Totals section.
The purpose of subcosts is to calculate a price for the parent item while excluding the prices of child items. This is most applicable to made-to-order workflows where every item is unique, as determined by the order.
In order for aACE to populate the Subcosts field for your Assembly item, you must change the child item values to $0. This allows aACE to calculate the full production cost of the overall Assembly item.
- Click Save and at the prompt, click Open.

 Note: If you only specified one upgrade item on your assembly item, and then you marked that item as Auto-Add, this will result in two lines showing that same LIC. You can remove LICs from the Order Items list by clicking the line-level Actions icon (
Production Jobs and Tasks
Now that you have an open production order, you can review what needs to be done to fulfill the order. Click the Management tab. This displays data in the Shipped and Invoiced columns, as noted in the Sales Orders training guide. In addition, the Produced column also has data. It shows the number of items currently produced compared to the number of items needed.

For more details, click the Production tab. This shows each of the assembly items you selected. The Jobs section also shows the jobs that aACE automatically created to help manage production for the items.

The first job listed represents the production order itself. It is called an order job because it provides a way for your production team to see details about the order, without viewing all costs, prices, margins, etc.
Under the order job, each assembly item has its own job as well. These related jobs, called production jobs, are distinguished by the number affixed to the order job number. The Status Indicators show that the order job is already in Open status. The production jobs are both in Pending status.

The general process for handling jobs in aACE involves you opening the job, applying job costs to it (i.e. material and labor), then closing the job. Each of these steps can be done manually. You can also configure your system with preferences that automate many parts of this process. The exact level of automation can vary between companies. Your aACE representative will help you identify the best fit for your organization's needs.
aACE also provides a number of mobile apps that support various steps of the production process. Several of these apps streamline interactions with the Jobs module.
Open the Production Job
To continue this workflow, you will open the production job and begin applying costs.
- Click the Go-To arrow (>) for the first production job (i.e. the record with the job number ending in “.1”).
This opens the Jobs module, showing the detail view for the production job. Because the job is still in Pending status, the Job Costs and the Tasks portals are inactive and grayed out.
- In the Jobs header, click Actions > Open. At the confirmation dialog, click Open.
This activates the portals. - Click the Job Cost Entry button.
This displays the Job Cost Entry window.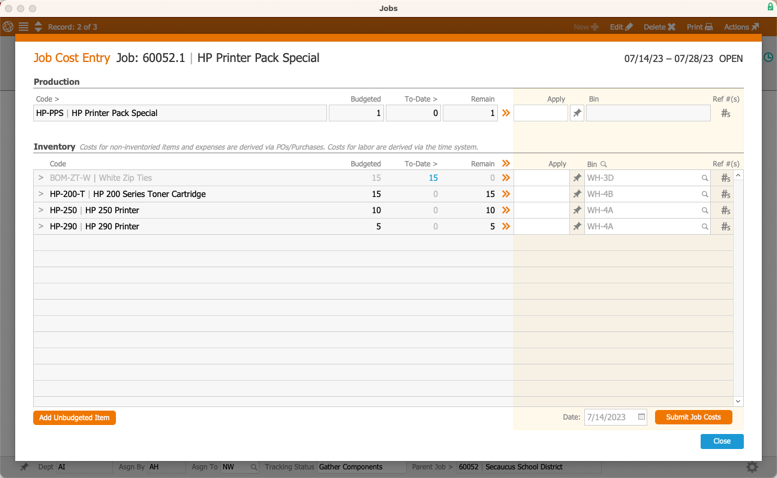 Note: The first item listed under the Production section is your final product. Do not apply this cost until you have completed the final product. Under the Inventory section, aACE lists the components of that final product. At the bottom, aACE provides an Add Unbudgeted Item button to note any unexpected costs that arise during production. The Date field allows you to submit backdated job costs.
For this training guide, assume that production has been completed. - At the top of the Inventory section, click the Quantity Transfer icon (
 ).
).
This copies all the values from the Remain fields to the Apply fields. - Click the Submit Job Costs button.
aACE processes the update. It sets the Remain column values to zeroes and the To-Date column values to match the Budgeted column. This means the budgeted costs have been applied. - Click Close.
If assembly items do not have Time LICs, aACE auto-closes the production job. This is due to the Management Preferences setting 'Auto-close jobs when they are full costed'.
Note: Some job cost components on the order were not applied. This is because time, expenses, and non-inventoried items are costs that are applied in separate modules. For example, time can be applied manually at individual task records and timesheets, or by using the Job Shop App. - Navigate to the production order again, then repeat the steps above to open and complete the second production job on the order.
As you produce each assembly item, aACE updates the order's Production tab values to reflect items that have been produced. Once you close all production jobs, you can also close the order job.
Note: You can also automate parts of this process through preferences.

 Note: The first item listed under the Production section is your final product. Do not apply this cost until you have completed the final product. Under the Inventory section, aACE lists the components of that final product. At the bottom, aACE provides an Add Unbudgeted Item button to note any unexpected costs that arise during production. The Date field allows you to submit backdated job costs.
The production order Shipping & Receiving tab shows items as Ready to Ship. If you set an order's Ship Type to Complete, aACE will not auto-generate an outgoing shipment until all the items are produced and ready to ship to your customer.
Automating Material Job Costs with the Backflush Preference
The aACE Management Preferences module provides a setting for 'Backflush inventory entry'. Found on the Production tab, this setting takes effect when you click the Quantity Transfer icon for the main production product. aACE applies all the inventoried item job costs to each of the component items. This represents the inventory being used to produce the final product. This preference is typically enabled on a Discovery system.
This automation is valuable for companies who frequently produce the same item(s) and the process uses an exact amount of inventory.
Order Entry Automation with Templates
If you have products you regularly input into orders, you can use aACE's order templates to auto-enter components for your production orders. These templates can auto-enter upgrades and alternates for assembly items. This helps automate your order entry process.
Test Your Understanding
After working through the tasks in this training guide, use this online exam to see how well you understand these aACE features: Production Discovery Training Quiz
