This guide walks you through tasks for learning how to work with system administration features in aACE. It is intended for new users in the Discovery process.
Introduction
This training guide helps you start exploring the tools that aACE provides for managing your system and the team members who work with it.
This guide focuses on the several different modules. First, you will look at how team member records help you organize responsibilities and record access. Then, you will shift to the Teams, Notices, and Notice Setups modules to see how aACE supports communications to help sustain your workflows. Next, you will work with the User Groups module, which is the main method for controlling access to your aACE system. After that, you'll review the Management Preferences module, where you can set many of the preferences that help configure your system to your business needs.
For additional insights, be sure to watch the webinar about system administration.
This guide will not focus on basic steps or knowledge. It presumes you are familiar and comfortable with the foundational topics already covered:
- Discovery Training: Basics
- Discovery Training: Purchase Orders
- Discovery Training: Sales Orders
- Discovery Training: Production
- Discovery Training: Inventory
- Discovery Training: Accounting
Team Members
Each person in your organization who will interact with your aACE system needs to have a team member record. The team member record enables them to use aACE features. Even features that don't require a person to log in to the system (e.g. email-based timesheets, mobile apps) still require a team member record. In contrast, an aACE user is a team member who actively logs in to your aACE system
Because team member records represent all personnel who interact with aACE, they allow you to record human resource and other details for each person. This involves contact information, time and expenses, and office assignment. This information can be useful for internal communications and management.
Create a New Team Member Record
When a person in your company needs to work with aACE, the first step is to create their team member record. For this exercise, use these steps to create a team member record for a fictional user:
- Navigate from Main Menu > Internal > Team Members.
- Click New.

- Fill in the required fields for setting up a new team member.
Note: You can use the Type field to create customized categories for grouping team members. - Click Save, then click Activate.
Note: You might not want to activate a team member record immediately. This often depends on how your company segregates responsibilities for onboarding. For example, a person in the IT department might create the record, but a person in the HR department might finish filling out the data later and activate the record.

Click the Human Resources tab to review additional functionality. You can control access to this tab through user group access privileges (see below).

Some key details are located in the Record Access section at the bottom. These flags and fields control which system records a person can view and whether they can switch offices:
- Can view records assigned to any office — Marking this flag updates the drop-down list below to show 'All Offices'.
- Can view records only assigned to the offices listed below — Marking this flag limits access to only the records in the offices you select.
- Offices drop-down list — This Search icon and field become active after you mark the flag above. Click the Search icon, then use the selector to specify which office(s) the team member needs to access.
- Can switch offices — Marking this flag allows the team member to use the Main Menu to change their current office assignment.
- Can view records assigned to any department — Records in aACE are linked to a specific department within an office. Typically, team members will only work with records in their assigned department. However, marking this flag allows the team member to work with records in all departments of the offices they can access.
- Can edit Comments and Activities — aACE provides robust tools for tracking progress and changes on records. Marking this flag enables the team member to use the Actions options in the top-right corner of a record to open the Log Viewer, then edit certain kinds of time-stamped notes.
After creating a team member record, you may also need to also create the contact and company records for that team member. Contact records allow you to specify the geographic location where a team member works and to establish a network of related contacts and companies. Company records connect the team member to aACE functionality for making payments, such as expense envelopes, commissions, and more.
Teams
After you create a team member record, you can assign them to one or more teams. Teams help organize groups of users for receiving notifications. For example, when you activated your new team member record, aACE sent a message to all team members in the Human Resources team.
You can use the existing teams in your Discovery system and also create custom teams as needed.
Add a Team Member to a Team
- Navigate from Main Menu > Internal > Teams.
- Click the Go-To arrow (>) for the desired team.
- Click Edit.

- Specify a new team member in the Team Members section using one of these methods:
- In the blank line at the bottom of the section, type the team member's name or initials.
- In the Team Members section, click the Search icon (
 ), then use the selector to locate and select your new team member.
- Click Save.

 ), then use the selector to locate and select your new team member.
Adding a Batch of Team Members
You can add a group of team members to multiple teams at one time:
- At the Teams module list view, refine the list to show the teams you want to update.
- Click Edit > Add Team Members to List.
- At the confirmation dialog, click Add.
- At the selector, specify the desired team members, then click Save.
You can also use these Edit options to remove multiple team members from multiple teams.
Notices
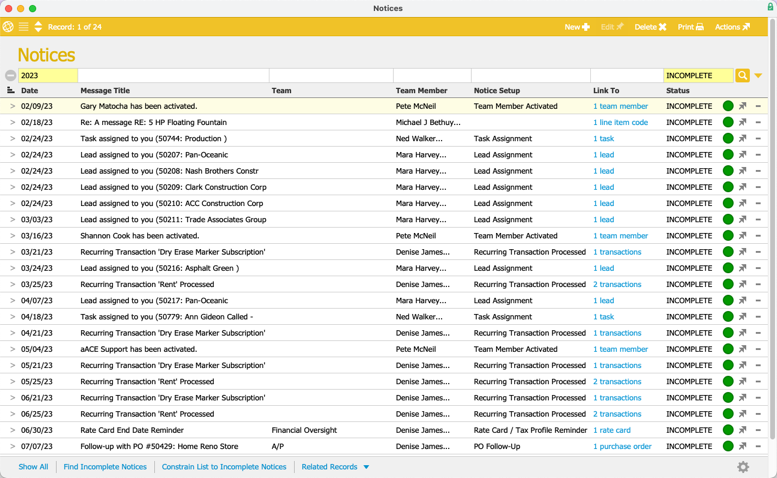
Notices are messages within aACE to help your team organize their workload. You can view existing notices from two modules:
- Notices Module — Helps you search through and review all notices in your entire system. You can display the Notices module by navigating from Main Menu > Internal > Notices:
- My Notices Module — Let's you see all notices that are assigned to you.:
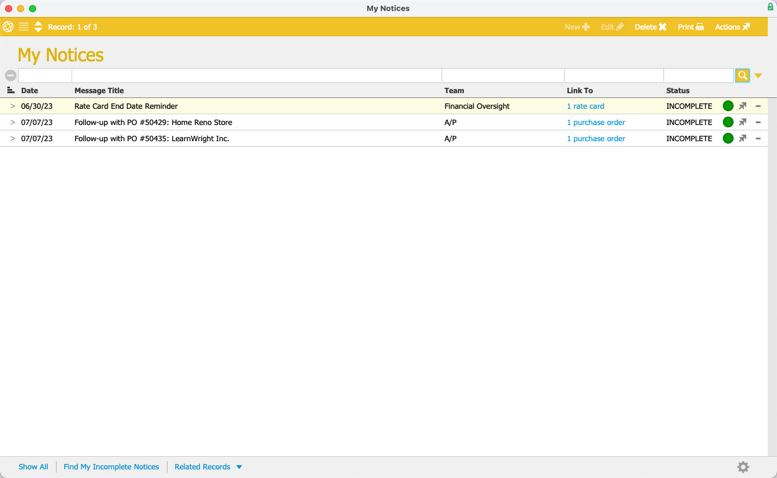 You can display the My Notices module by clicking the Notices link on the Main Menu:

 You can display the My Notices module by clicking the Notices link on the Main Menu:
Notice Setups
You can configure various notices to best address your company's communication needs. Your Discovery system includes many standard notices that you can use, adjust, or duplicate to make changes. You can also create entirely new notice setups.
For more details about how you can leverage this feature, read our feature highlight about using notice setups to track important dates.
Create a Notice Setup
To practice with these features, create a fictional notice setup:
- Navigate from Main Menu > System Admin > Notice Setups.
- Click New.
- Enter information for the required fields:
- Notice Setup Name
- Notice Title
- Notice Message

- Enter information for the Setup Info section:
- Team — Click and select an existing team.
- Message Types — Mark the flags for all delivery methods that should be used for this message.
- Single User Completion — Messages delivered as aACE notices can be flagged for one person to mark the task as completed for all team members who receive it. If this flag is cleared, then each person who receives the notice must individually complete it.
- Allow Archiving — Marking this flag lets you specify the number of days before aACE will automatically move completed notices off the Notices list.
- Click Save and Activate.

Using Merge Fields in Notice Setups
Merge fields are placeholders that designate specific data to be displayed. For example, the merge field <<OrderTitle>> will display the title of the order you're working with. You can use merge fields in the Notice Title and the Notice Message.
You can read more about working with notice setups.
User Groups
After a team member logs in and accesses aACE, the things they are able to do are governed primarily by their assigned user group. Your Discovery system includes some standard user groups as sample data. When you go live with aACE, these groups can be customized to your business needs.
You will assign your new team member to a user group. After that, you will set up their access to the system.
Assigning a Team Member to a User Group
- Navigate from Main Menu > System Admin > User Groups.
- Click the Go-To arrow (>) for the Warehouse Team.
This shows the primary fields you can use to configure a user group.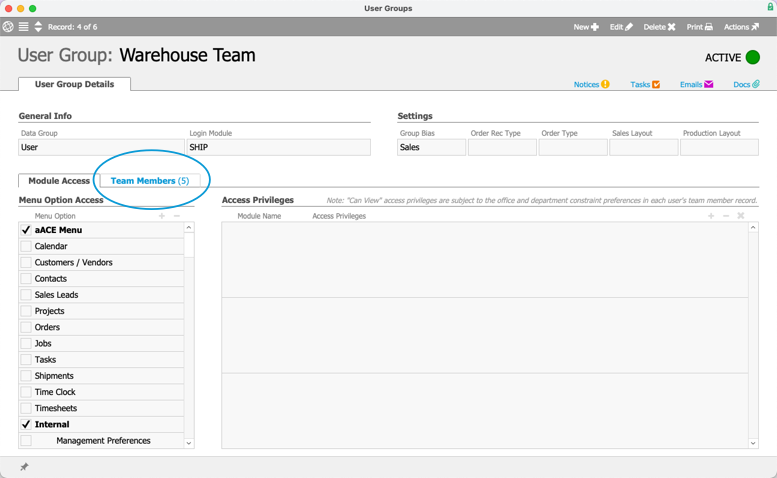
- Click the Team Members tab.

- In the Team Member section, click the Search icon (
 ).
). - At the selector, locate and select the team member record you created, then click Save.
This adds the new team member to the group, listing them in alphabetical order.


 ).
).When you add a team member to a user group, aACE automatically creates an Account Name for them. The default consists of first and last name. You can edit account names as needed. This Account Name is the ID the team member will use for logging in to aACE.
Granting Access Privileges to a User Group
When you add a team member to a user group, they gain the access privileges of that user group. aACE displays these privileges on the Module Access tab. To practice working with this feature, add some additional access privileges for this group.
- Click the Module Access tab.
- In the header, click Edit.
- In the Access Privileges section, click the Search icon (
 ).
). - At the selector, locate and select the Shipping Log module, then click Save.
aACE adds this module and its various privilege flags to the user group. - In the Shipping Log privileges section, click the Plus (+) at the right side.
aACE marks the flags for all the privileges.
- Click the flag for _Admin to clear it.
This will prevent team members in this user group from accessing admin functionality in the Shipping Log module.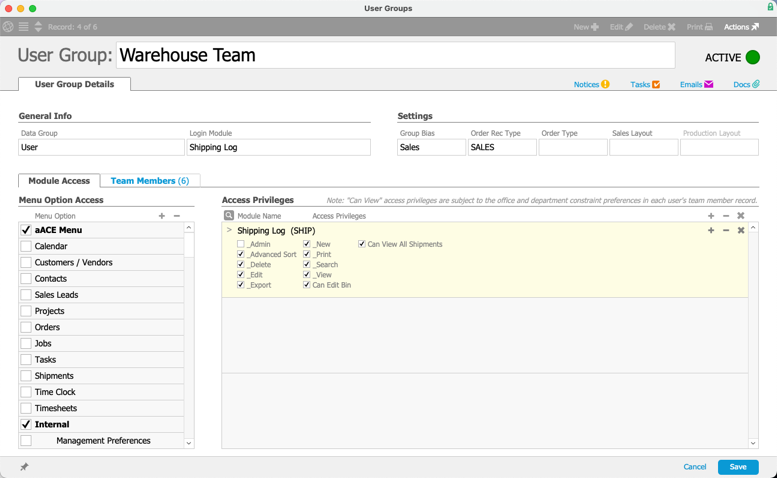
- Click Save.
 ).
).

You can read more about features available on the User Groups module.
Caution for Setting User Group Access
The Module Access tab helps you govern access using two sets of controls. The Menu Option Access panel is on the left. These settings control which options are displayed on the Main Menu. The Access Privileges are on the right. These settings help manage access, but focus on controlling activity in a module.
These two sets of controls help you ensure that you deliberately grant the needed privileges to users. This helps prevent users from accidentally having access to records they should not view or activities they are not qualified to conduct.
Warning: Please be mindful that clearing a Menu Option Access flag for a certain module does not necessarily prevent a user from accessing that module. aACE includes many features that allow team members to navigate from records in one module to related records in another module. To fully manage your company's access needs, you must also configure both the Menu Option Access and the Access Privileges sections.
To view an example of access controls, scroll down in the Menu Option Access list to find the Companies module entry, then select it. This displays the associated access controls on the right. Scroll down in the Access Privileges list to find the Companies module.

Access privileges restrict or enable certain activities in a module. Marked privileges are enabled for team members in this user group. In the Companies module, they can create new records, edit existing records, delete records in Pending status, and more.
This approach to system access gives you quick and thorough control over functionality. If you decide that team members in a certain user group should be able to view company records, but not make changes to them, mark the View flag and clear the Edit flag.
Management Preferences
In addition to user groups, there are controls and settings in other modules. A prime example is the Management Preferences module. From the Main Menu, click Internal > Management Preferences.

This module provides control over details that companies commonly want to adjust. This helps you easily set up aACE in the way that best supports your business needs. These settings work hand-in-hand with user groups. Your aACE representative can help explain these preferences so you have the best configuration.
You can read more about management preferences.
Additional Tools for System Administrators
aACE provides other tools to help you manage your system. A few examples include:
- Admin Export — This feature helps you export data from aACE to use in other tools. You can access it through the Admin Actions options icon (
 ) found in the footer bar of certain modules. Using this feature includes certain constraints.
- Users must be in a user group that has both _Admin and _Export flagged for a module under Access Privileges.
- Users cannot export information that their access privileges do not allow them to access.
- All exports are tracked in the log files, noting when the export was done, how many records were exported, and more.
- For system security, aACE limits the number of records you can export at one time to 5,000. Also, if someone exports 80% or more of the records in a module, aACE sends a notice to the Export Oversight team.
- Re-login — When you have changed a setting, FileMaker sometimes requires you to log out and in to see the effects of the change. The Re-login command provides an easy way to refresh your FileMaker session.
- On Mac — Navigate to the FileMaker application menu bar > File> Re-login.
- On PC — Navigate to the top of the aACE Main Menu > File > Re-login.
Test Your Understanding
After working through the tasks in this training guide, use this online exam to see how well you understand these aACE features: System Admin Discovery Training Quiz
